The DAIR Program is longer accepting applications for cloud resources, but access to BoosterPacks and their resources remains available. BoosterPacks will be maintained and supported until January 17, 2025.
After January 17, 2025:
Screenshots should remain accurate, however where you are instructed to login to your DAIR account in AWS, you will be required to login to a personal AWS account.
Links to AWS CloudFormation scripts for the automated deployment of each sample application should remain intact and functional.
Links to GitHub repositories for downloading BoosterPack source code will remain valid as they are owned and sustained by the BoosterPack Builder (original creators of the open-source sample applications).
This Sample Solution demonstrates how Parabellyx uses Jenkins/SonarQube with Kubernetes to find vulnerabilities in your organization’s software by integrating static application security testing (SAST) and dynamic application security testing (DAST) into the software development pipeline. The Sample Solution is broken into two parts; we’ll begin with the SAST setup before demonstrating the more complex DAST setup. DAST is used to automate security testing of a deployed web application.
Problem Statement
As we discussed in the Flight Plan, an organization’s software vulnerabilities can be exploited to render their vital infrastructure inoperable, expose confidential information or personal data. Ensuring safeguards are in place to detect vulnerabilities in the early stages of software development can mitigate the costly risk of your software being compromised.
Project Iris provides a lightweight system that can be used to rapidly create tooling to incorporate SAST scanning of source code and DAST scanning on deployed web applications. The open-source solution allows organizations to explore and learn how to integrate SAST/DAST into their software development practices without paying fees for a commercial SAST/DAST solution. Additionally, Project Iris is modular and allows the organization the freedom to choose whether to have a full comprehensive SAST/DAST solution or to use a subset.
Sample Solution Overview Diagram
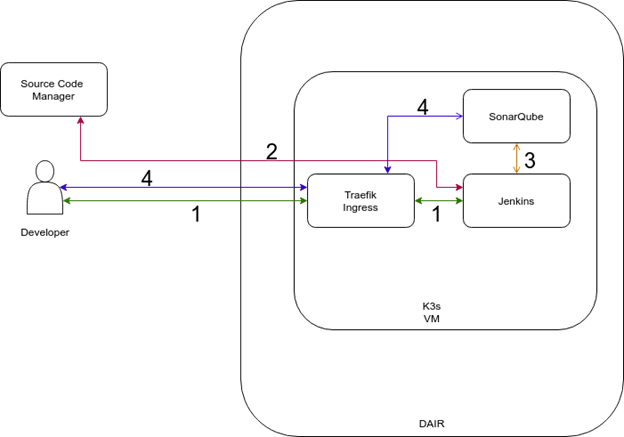
The diagram below illustrates the structure of the Sample Solution.
Structure of the SAST Sample Solution
The entire solution (SAST & DAST) is deployed to a single virtual machine instance in the DAIR Cloud. The virtual machine instance will be using K3s, which is a lightweight Kubernetes implementation. The K3s will be used to manage three applications needed to operate the SAST solution.
Traefik for managing ingress
SonarQube to scan the source code for vulnerability and poor coding practices
Jenkins to help automate the process of pulling the source code, performing scans on the source code, and sending the results to SonarQube.
The SAST solution will be configured to target application source code contained in a source code repository (e.g., Github, GitLab or BitBucket).
Component Descriptions
Component
Description
DAIR Cloud
DAIR Cloud provides a hosted-in-Canada public cloud platform for participants to access and manage public cloud resources.
K3s
A lightweight Kubernetes implementation backed by the Cloud Native Computing Foundation (CNCF). K3s offers the same functionality as Kubernetes but is suited for systems with fewer resources.
Source Code Manager (SCM)
SCM is a system used by developers to help maintain changes to source code. Popular examples are Subversion and Git.
Jenkins
Jenkins is an open-source automation tool that allows the organization to configure continuous integration and continuous deployment of software solutions.
SonarQube
SonarQube is an open-source software tool that provides scanning of various programming languages’ source code to detect vulnerabilities and help improve the software development practices of the organization.
Zaproxy
Zaproxy is an open-source DAST product that is widely used for detecting vulnerabilities on web application against the Open Web Application Security Project (OWASP) list of common vulnerabilities.
1. You have set up a security group rule that allows you to SSH (TCP port 22) into VMs that are spun up in the DAIR Cloud from the IP you are accessing the VM.
DAIR participants can deploy the Sample Solution by following the steps below.
Log in to your AWS DAIR account with instructions provided to you by the DAIR team.
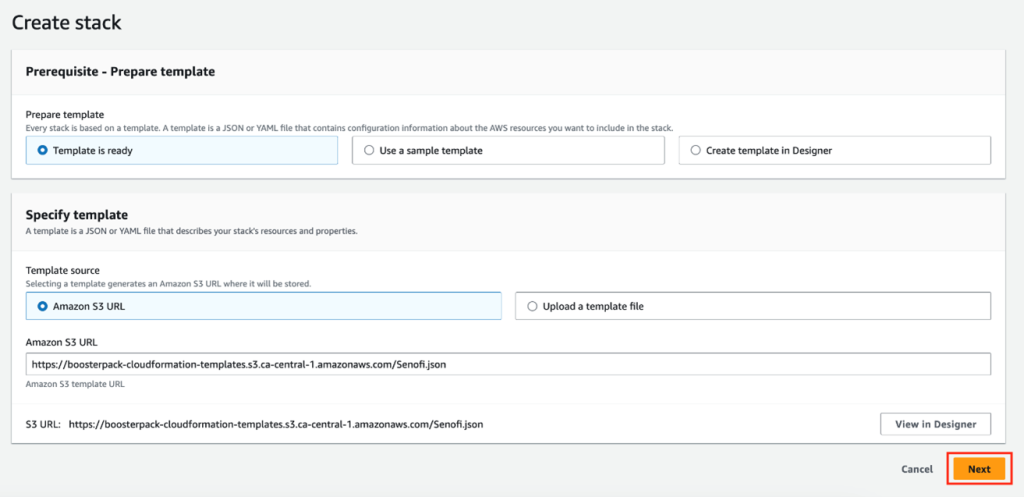
Click DEPLOY to launch the BoosterPack using AWS CloudFormation stack.
Complete the configuration form
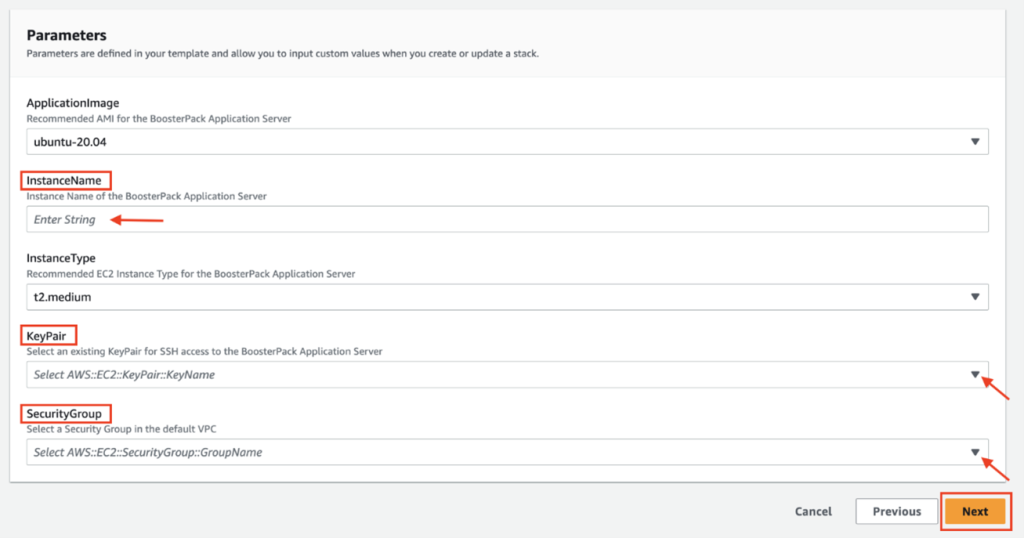
Click Next to go to CloudFormation step 2 and fill out the parameter configuration form. In the InstanceName field, type in a unique instance name for your application server and then complete the rest of the form using the drop-down options. Please note that parameters (such as “ApplicationImage” and “InstanceType”) are pre-configured and cannot be modified.
Please note that parameters (such as “ApplicationImage” and “InstanceType”) are pre-configured and cannot be modified.
Click Nextto go to CloudFormation step 3. This section is for configuring additional/advanced options which are not required in our use case. Click Next at the bottom of the page to skip step 3 and get to the final step for CloudFormation.
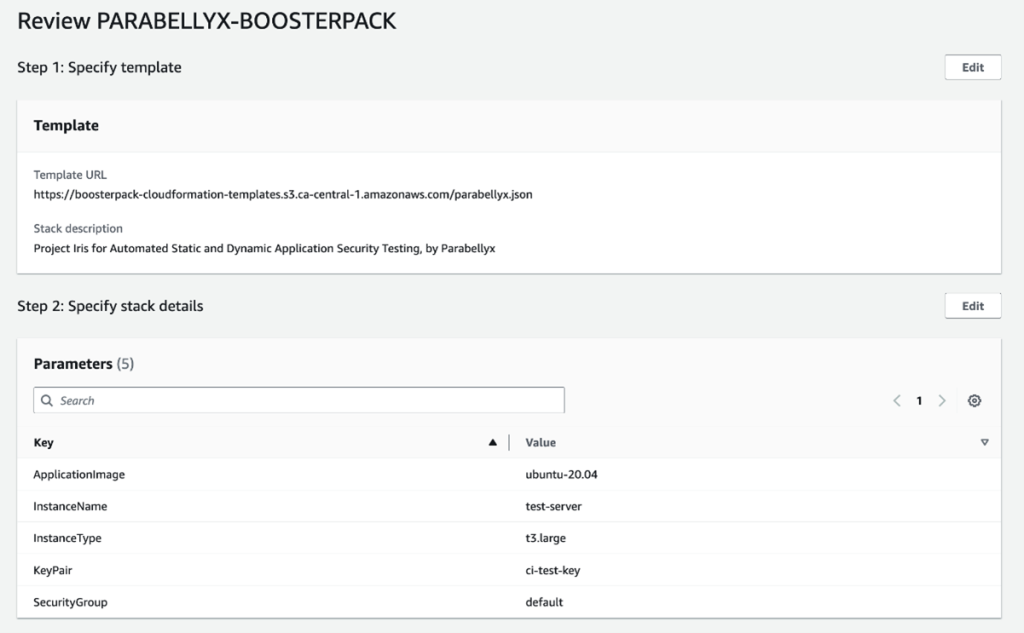
The final section allows you to review existing BoosterPack configurations and provides options for making configuration changes, using the Edit button, if needed. Once satisfied with the existing configuration, click Submit at the bottom of the page to deploy the BoosterPack.
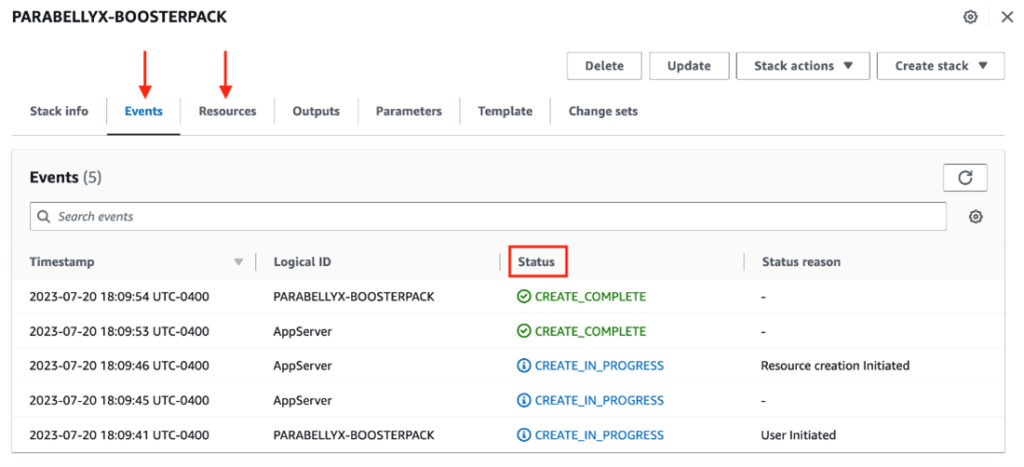
The BoosterPack deployment will create a new instance and the deployment automation will follow. However, you can only monitor the status of the AWS instance through the Events and Resources tab of the CloudFormation page. You will need to log in to the application server to confirm the deployment automation status.
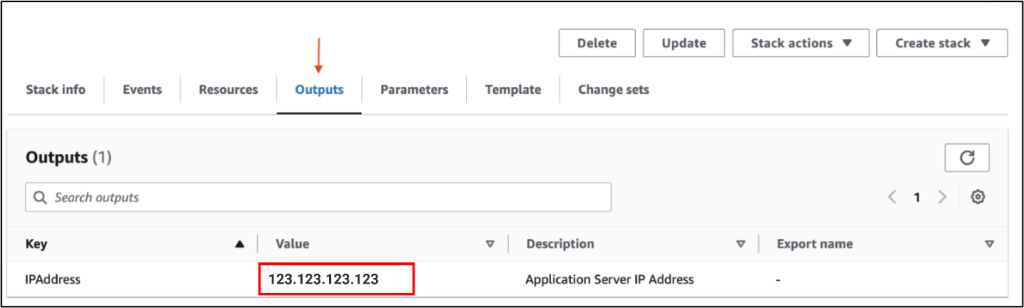
Also take note of the IP address value found under the Outputs tab of the BoosterPack CloudFormationpage. This is the external IP of the BoosterPack instance being created. You will need this IP address to access the web interfaces of the sample application or to login to the server using SSH.
From a shell/terminal that has SSH enabled, log in to the application server with the following SSH command:
ssh -i key_file.pem ubuntu@IP
Replace “key_file” with the private key of the SSH key pair selected in the CloudFormation parameter configuration form and replace “IP” with the IP Address value obtained from the CloudFormation output.
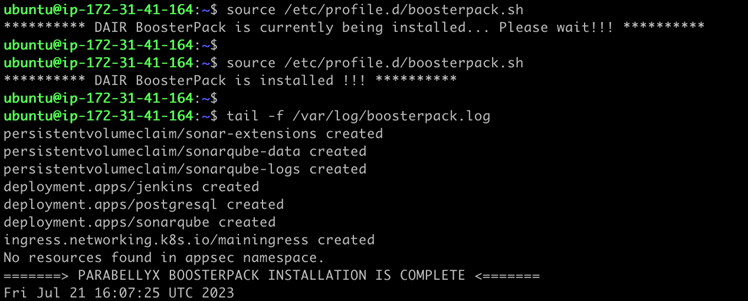
Once successfully logged in to the application server, you can monitor the status of the deployment automation script with the following commands:
source /etc/profile.d/boosterpack.sh
tail -f /var/log/boosterpack.log
The average time to complete the deployment process is around 7-10 minutes.
Navigate to the security group configuration in AWS to add inbound rules to the default security group selected in the CloudFormation parameter configuration.
Ensure that the security group selected to be used with this VM contains rules allowing inbound access to SSH (port 22), HTTP (port 80) and HTTPS (port 443) from your external IP address so that only you can access the VM.
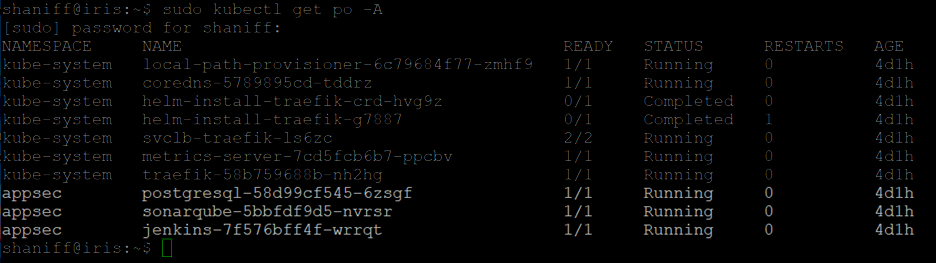
While logged onto the application server, to verify the orchestration has worked, run the command:
sudo kubectl get po -A
You should see three pods under the appsec namespace with the Running status.
Congratulations! You are now on your way with the SAST/DAST deployment.
Configuration and Application Launch
Log into SonarQube to create a project to manage the vulnerabilities and code practices.
Next, log into Jenkins to create the pipeline to communicate to the Source Code Manager and configure Jenkins.
Configure SonarQube
1. Log into the SonarQube dashboard through the following link https://[external.ip]/sonar (in our sample it is https://3.97.188.167/sonar).
If you do not have a valid HTTPS certificate, a warning page will indicate a security risk. For now, ensure that the URL is correct and continue to the web page.
2. Enter “admin” and “admin” for the SonarQube login credentials.
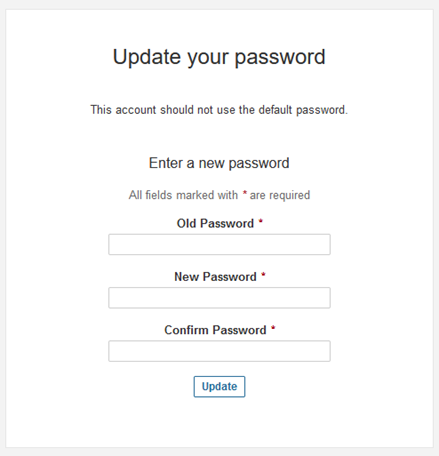
3. Update your password from the default.
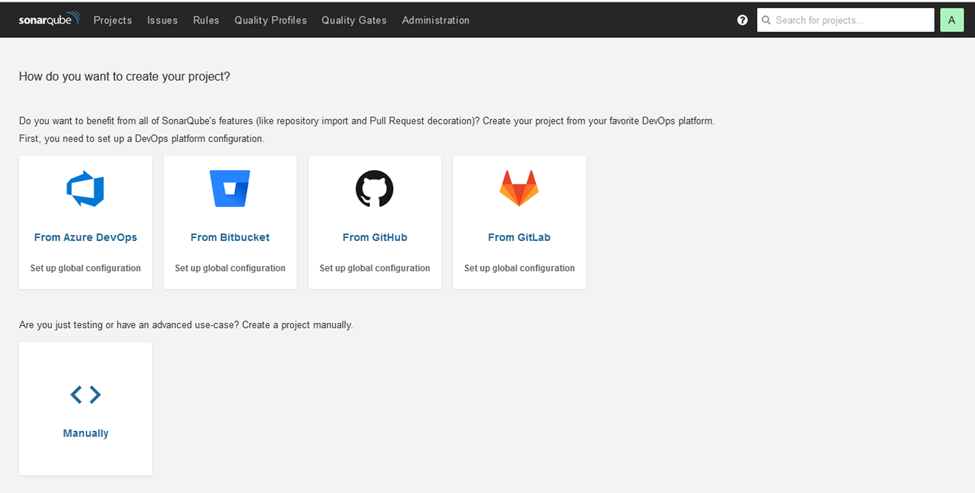
4. When the password has been updated, the next page will display a list of DevOps platform integration options or manual setup for the project.
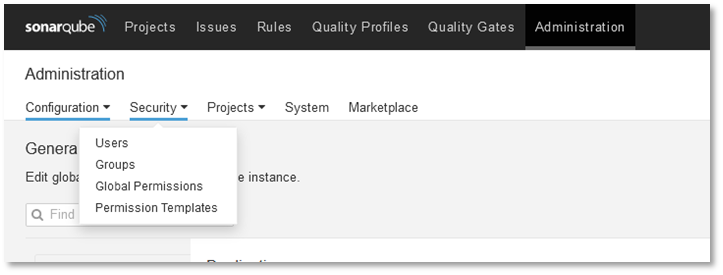
At this point, it is advisable to create a user separate from the admin user.
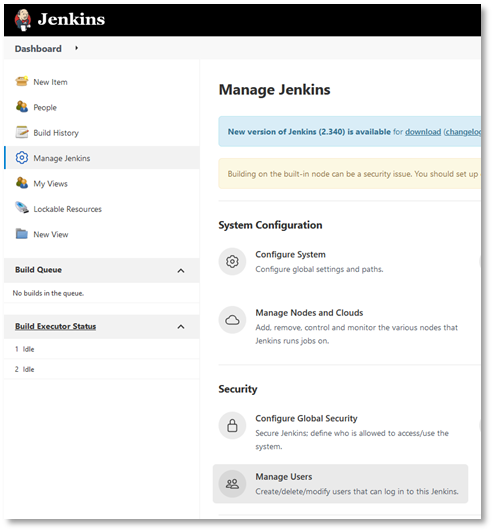
5. Click Administration on the top menu bar. From there, click the Security drop-down menu and select Users.
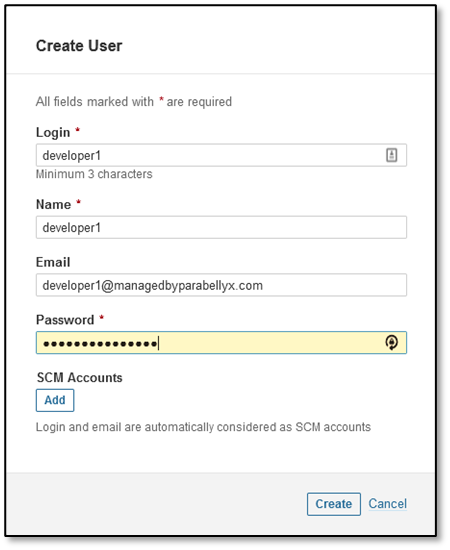
6. Click Create User on the top right. For this sample solution we will create a user called ‘developer1’.
Going forward, we will use the developer1 account. We are now ready to configure Jenkins.
Configure Jenkins
1. Open a new tab in the browser and go to https://[external.ip]/jenkins (replace [‘external.ip] with the Iris VM external IP address you noted earlier).
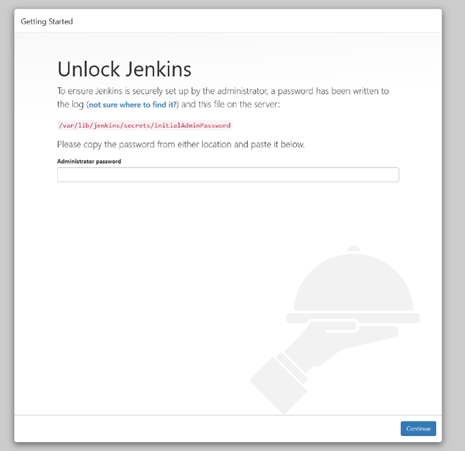
2. To retrieve the default Admin password for Jenkins, return to your Iris VM console (SSH session) and execute the following command:
3. Copy that string sequence and paste it into the Administrator password field.
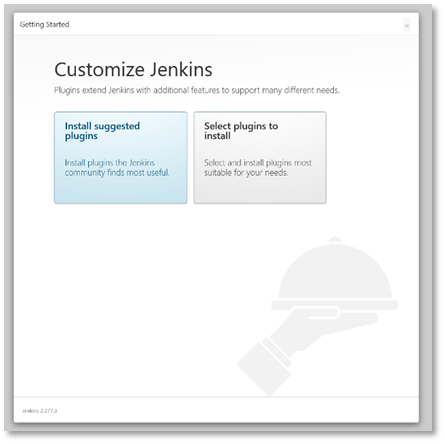
4. Next, click Install suggested plugins – this will install the base plugins for Jenkins.
5. Now, create an Admin account.
6. Click Save and Continue.
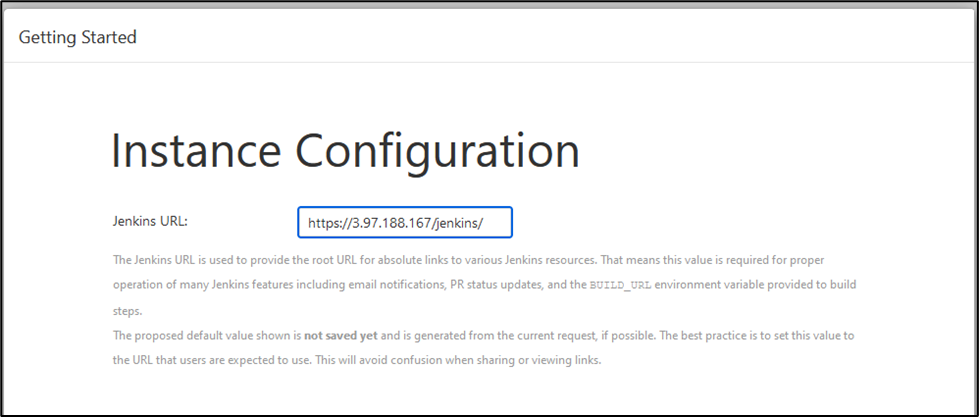
For the Instance Configuration, the default value is recommended. Ensure that the Jenkins URL includes the specific external IP of the VM.
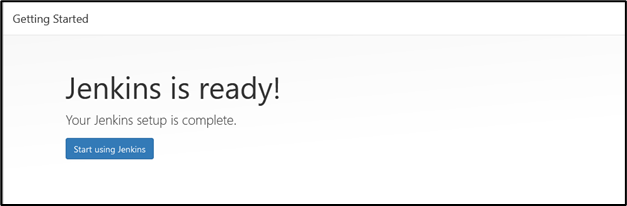
7. Click Start using Jenkins to finish the configuration.
Create a Jenkins user account
1. Click Manage Jenkins on the left pane, then Manage Users under the Security header.
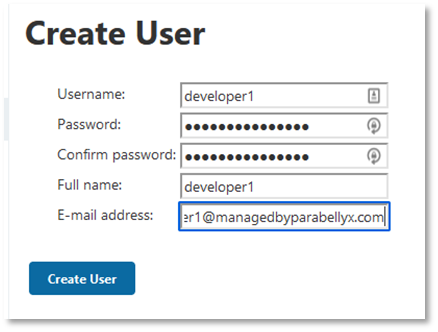
2. Click Create User on the left pane and fill in the text fields.
In this case we will create an account for developer1. Going forward in this Sample Solution, we will use developer1 for Jenkins.
This completes the configuration of SonarQube and Jenkins.
Technology Demonstration
SAST Solution
This section demonstrates Iris’s SAST function. Iris accelerates the time to onboard SAST into the development team’s workflow. It also ensures that the onboarding process does not interfere with current workflows and can be cleanly removed.
The Sample Solution illustrates an example of using the SAST functionality on a project located in your source code repository. For this example, we will be using the Damn Vulnerable Web Application (DVWA). It is designed as a deliberately broken application, full of vulnerabilities. The source code is located on Github as a public repo which you should clone to your personal Git repository using the following command: git clone https://github.com/digininja/DVWA.git
Create Personal Access Token through Github
If your cloned copy of the DVWA repo has been published to your GitHub account as a private repository, Jenkins will need to authenticate to get access to the code repo. If you’ve published to your GitHub as a public repo, skip to here.
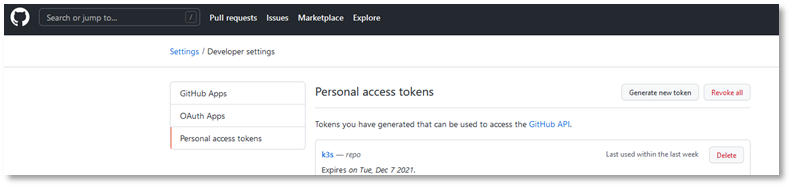
1. Create a Personal Access Token through your profile on Github.
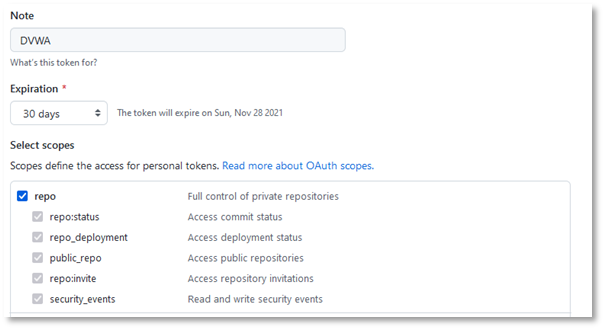
2. Under Select scopes, click the checkbox next to repo, then scroll to the bottom and click Generate token
3. Save the token to a secure location to be used later in the configuration.
Create SonarQube project
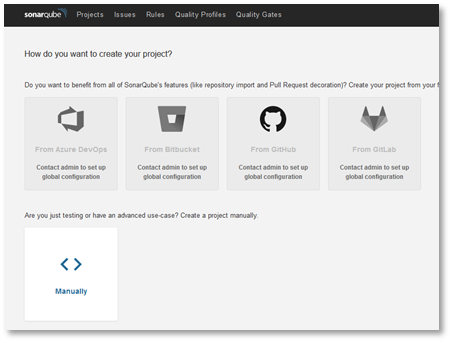
1. Log in to SonarQube with the developer1 account and select Manually to create a new project.
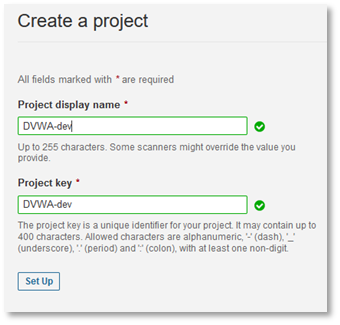
2. For Project display name and Project key, enter a descriptive project name. We will use DVWA-dev. Click Set Up to continue.
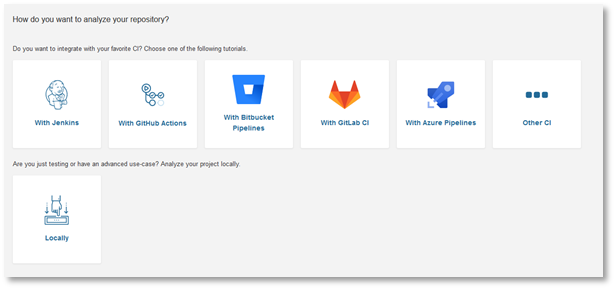
3. Although there are integration methods available for most popular pipelines, we recommend you select Locally – this provides the most customizable method and prevents dedicated pipelines. You are welcome to explore the dedicated CI pipelines.
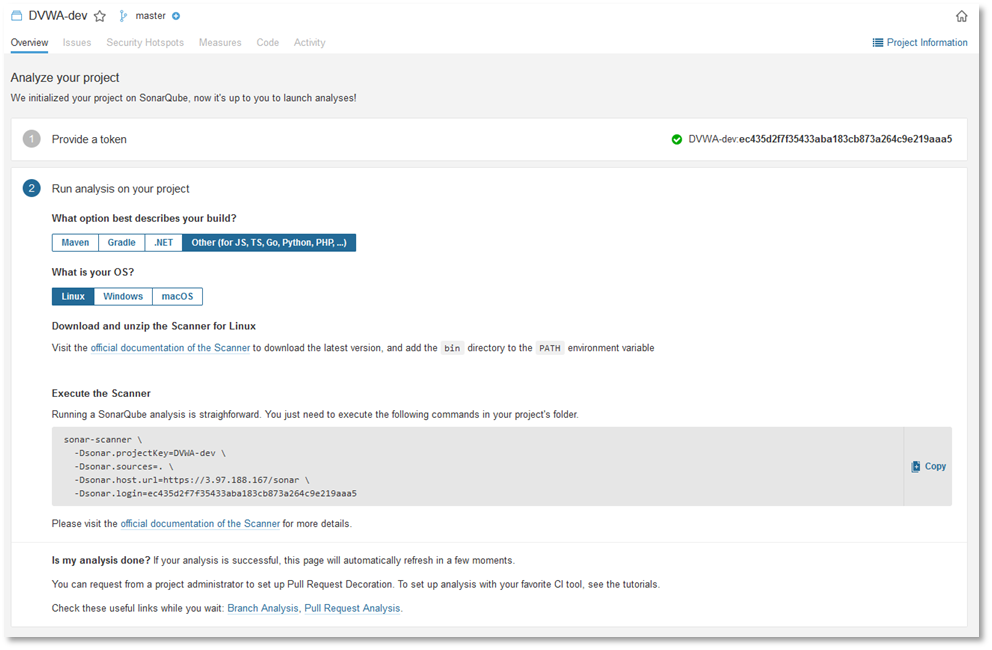
4. Enter a random string to generate a token and click Generate. When the key has been generated, click Continue.
5. Since DVWA is a PHP application, select Other for the build, then select Linux.
A box will appear with a sonar-scanner command that has been executed by a Linux shell on the CI pipeline (Jenkins).
Important: Save the contents of the sonar-scanner commands in a temporary text file, as you will need it later.
This completes the setup of the project on SonarQube.
Create Jenkins Pipeline
1. Log onto the Jenkins webapp as developer1
2. From the main menu, click Create a job and you’ll see the page containing project selections. Enter dvwa-sast as the Item name and select Freestyle project. Click OK.
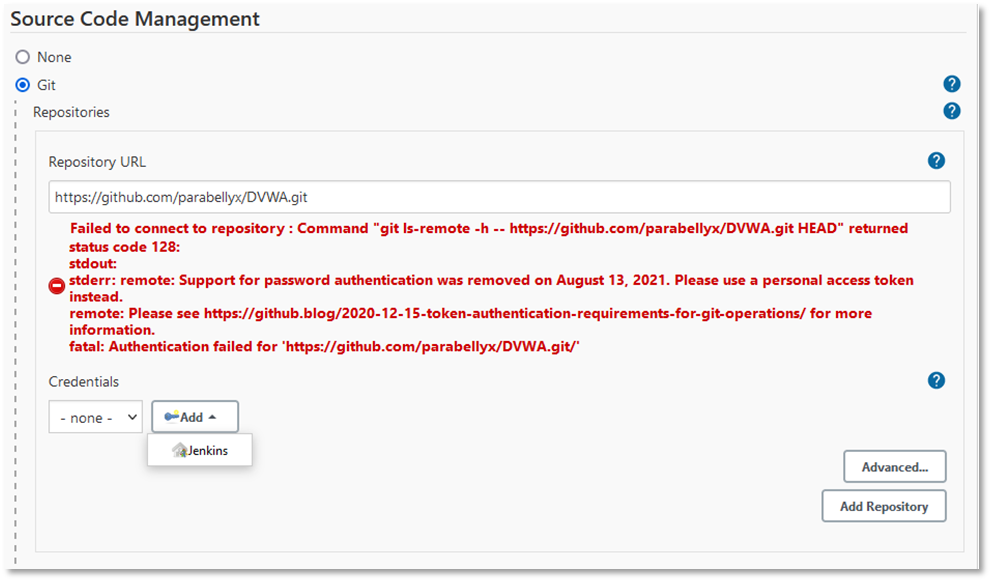
3. Under Source Code Management, select Git and input the ‘Repository URL’.
4. If you are using a private repository, Jenkins will not be able to access the source code without an access token. Configure access by clicking Add directly under Credentials and select Jenkins.
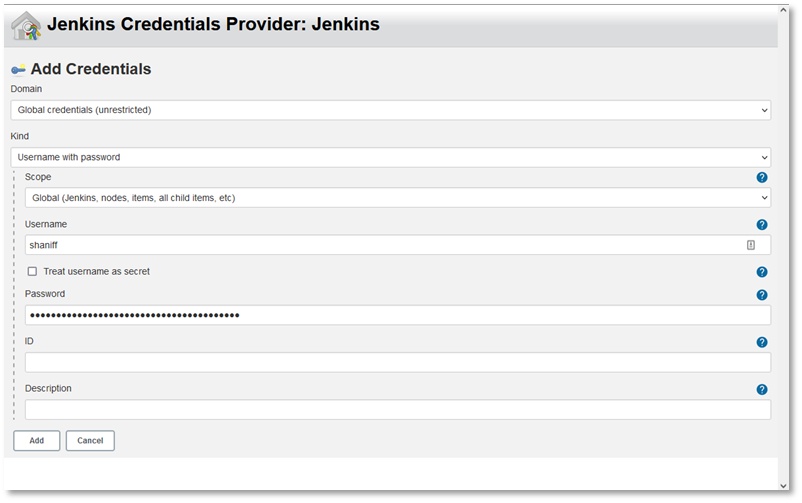
5. On the Jenkins Credentials Provider screen, under Kind select Username with password from the drop-down menu.
6. Enter your Github username and the Personal Access Token you created earlier as the password. When these fields have been populated, click Add.
7. Under Credentials, select your Github account and the authentication message to the Github repository should disappear.
Note: Jenkins may default to the ‘master’ branch for checking out into the pipeline. Some organizations have moved away from the ‘master’ terminology to ‘main’. Ensure that the Branch Specifier is set accordingly.
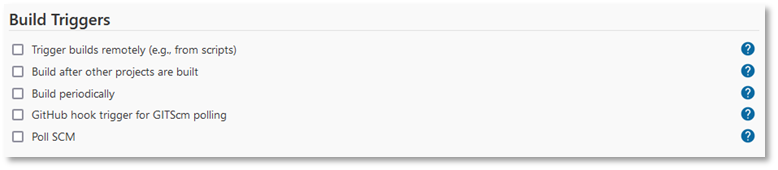
8. The Build Triggers are useful to help automate the starting of the pipeline. However, for this Sample Solution, the pipeline will be started manually by you so we will leave all boxes unchecked.
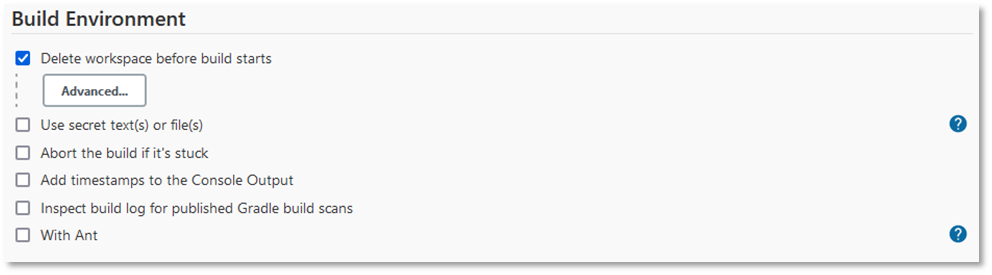
9. For Build Environment, it is helpful to check Delete workspace before build starts to remove any artifacts left behind from previous builds. The remaining options can remain unchecked.
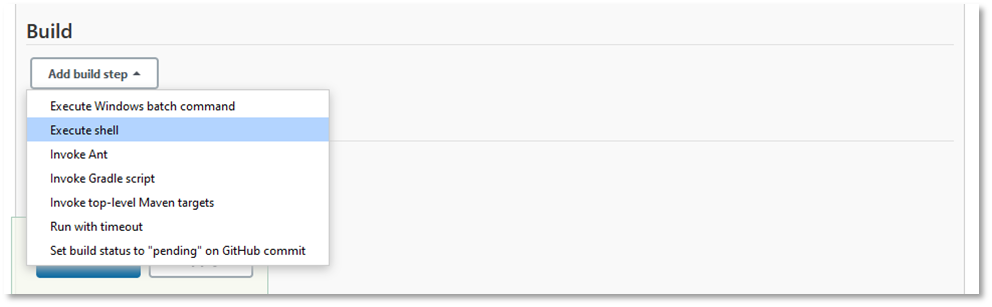
10. Two build steps are required to perform the SAST scan operations. Create the first build step as Execute shell.
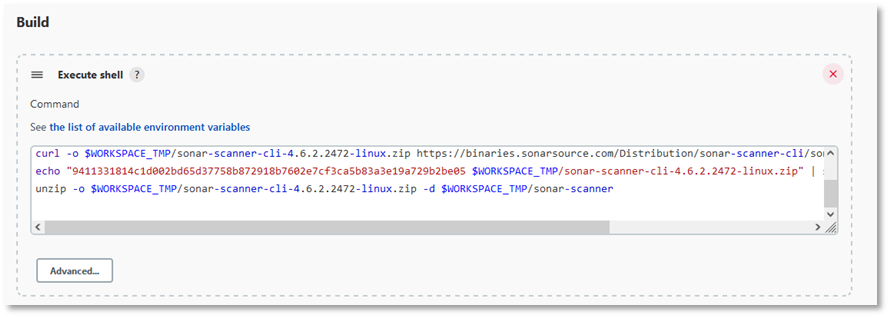
11. Insert the following shellcode into the ‘Command’ field:
This code will download the sonar-scanner-cli and verify the file’s integrity. The sonar-scanner performs the security analysis and sends the results to your deployed SonarQube server.
echo "9411331814c1d002bd65d37758b872918b7602e7cf3ca5b83a3e19a729b2be05 $WORKSPACE_TMP/sonar-scanner-cli-4.6.2.2472-linux.zip" | sha256sum --check unzip -o $WORKSPACE_TMP/sonar-scanner-cli-4.6.2.2472-linux.zip -d $WORKSPACE_TMP/sonar-scanner This code will download the sonar-scanner-cli and verify the file’s integrity. The sonar-scanner performs the security analysis and sends the results to your deployed SonarQube server.
Insert a second Execute shell command under the build.
To do this, copy the first two lines below and then
12. Paste the sonar-scanner command (the one you previously saved to a text file from the “Create SonarQube project” section) directly below the first two lines – as shown below.
Note: Do NOT use the sonar-scanner command from the sample below as your sonar.host.url IP and sonar.login key values will be different.
# Run scan export PATH=$WORKSPACE_TMP/sonar-scanner/sonar-scanner-4.6.2.2472-linux/bin:$PATH
Note: For the -Dsonar.host.url argument, be sure to use http and not https.
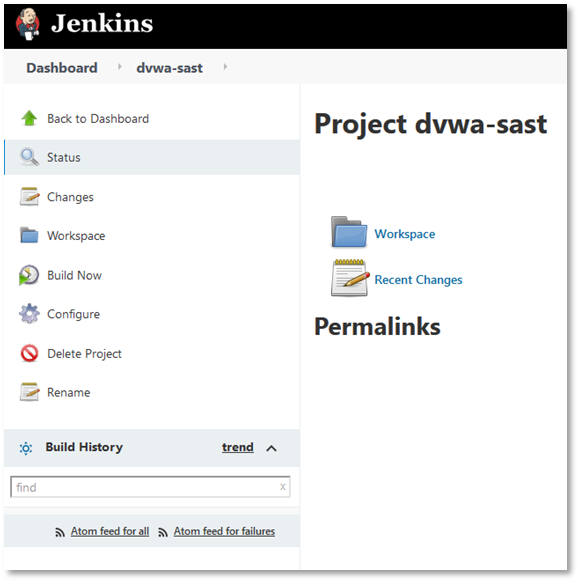
13. Click Save and the browser will be redirected to the Project Screen.
Run the SAST
You’ve completed the setup, now it’s time to see if it works!
1. Click Build Now to run the pipeline.
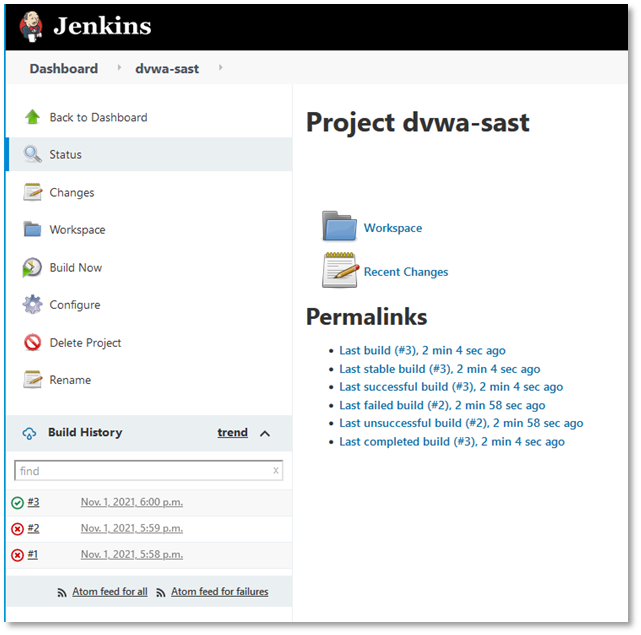
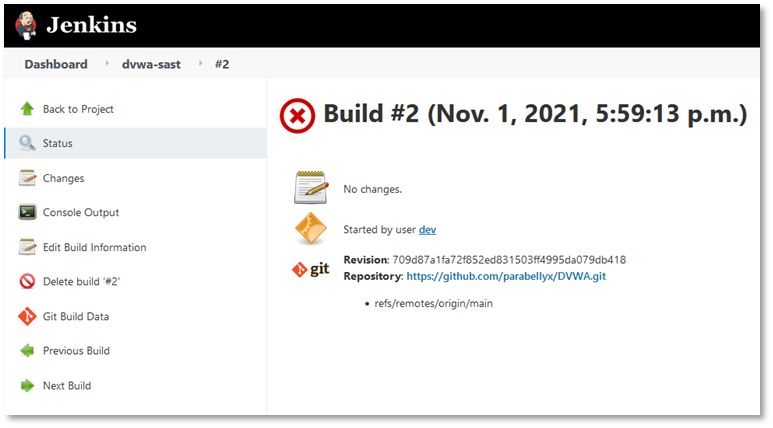
The build status will show under ‘Build History.’ In our previous attempts, we made an error in the Git configuration which referenced a branch that didn’t exist. To learn more about the issue causing the build to fail, click the build number next to the red x.
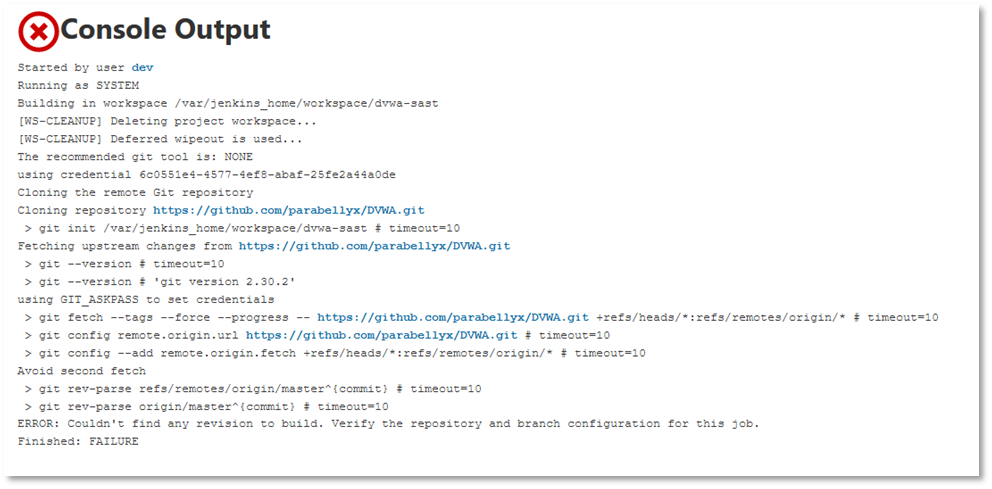
2. Click Console Output to help debug this issue.
The console output is the direct output of the lines being executed in the pipeline. Here we can see Git was called but the branch ‘master’ cannot be found (see step #13). Keep revising the project’s configuration when errors are encountered. Then repeat the ‘Build now’ process until successful.
Once you have a successful build…
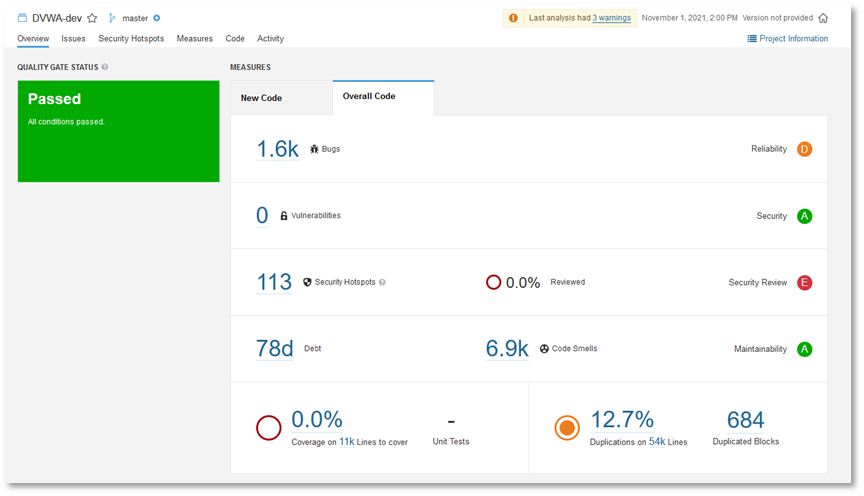
3. Return to the SonarQube dashboard (https://[external.ip]/sonar) and click the Project. There should be a populated dashboard of security findings (as shown below).
4. Click on the Security Hotspots tab to start determining steps for remediating your application.
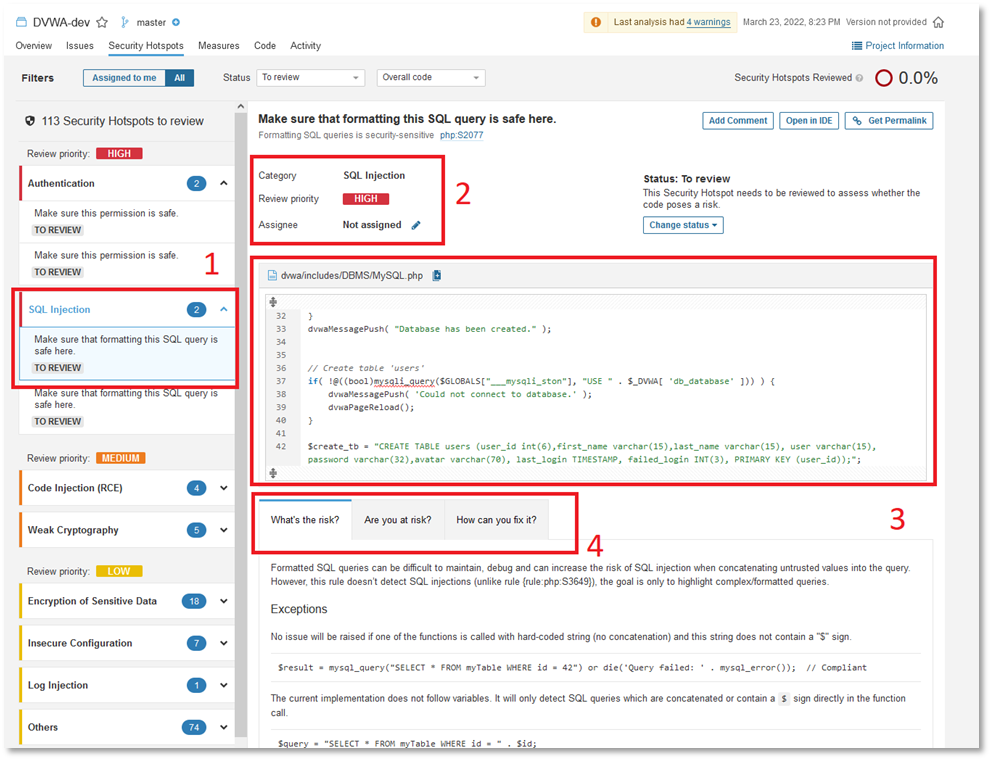
Analyzing the Results
1. For the DVWA application, expand the SQL Injection list and select the first finding to review.
2. Examine the vulnerability type and the severity.
3. Review the code snippet to determine if this finding is a true positive or a false negative.
4. If you have a true positive, SonarQube provides three information tabs to help you understand the risks and the steps to perform to mitigate or correct the vulnerability.
Termination
To terminate the solution and release any resources it consumes, return to the CloudFormation stacks page and delete the stack corresponding to the BoosterPack.
Project Iris was developed on a Kubernetes platform, specifically K3s. The YAML files for the deployment are located at the project’s Git repo and in /opt/iris. The design of Project Iris was intended to be deployed on a single VM. DAIR participants can access the YAML files to deploy the Kubernetes on the DAIR-provided cloud services or their own desktops on-prem. The Sample Solution uses Kustomize to help make modifications to the solution.
For the DAST deployment, we have shown a Windows desktop version of the DAST scanner in this Sample Solution. The Git repository contains a Linux shell script and a Jenkins file that could be used for Linux environments or a CI process.
Technology Alternatives
Alternative CI Pipelines
The code samples for the pipeline were written in shell script format. The shell scripts can be re-used when organizations have their own pipelines runners. Ensure that with this Sample Solution, a valid HTTPS certificate is installed to allow sonar-scanner to securely connect to the SonarQube server located on this Kubernetes cluster.
Alternative SAST Products
We researched other SAST products that provide the same feature-rich components provided in this Sample Solution. While the other products required projects to be hosted on a public repo or require payments to use, the projects listed below could immediately be used to provide some SAST functionalities:
Bandit
Bandit can scan python code to detect common security issues. It can be executed in the Jenkins pipeline as a substitute for SonarQube, and Bandit results can be stored using Jenkins’ artifacts feature. This tool can also run on a developer’s environment if you don’t want a centralized SAST solution.
Flawfinder
Flawfinder is used to scan C/C++ source code to report possible security flaws. Like the others, Flawfinder can be run in the Jenkins pipeline and have the results saved in the artifacts for reviewing.
npm
Running npm with the audit flag can highlight packages that have vulnerabilities. The audit results can be exported and saved using Jenkins’ artifact functions in the post-build steps. npm can be run on your desktop if you don’t want code sent to a centralized SAST solution.
Security
Access to this server should be limited to specific IP ranges. Consider creating a Security Group that can be applied to this solution. It should contain a list of ‘accept-only’ IP addresses.
Ensure that passwords used on SonarQube, Jenkins, and Keycloak follow the latest industry best practices. Make sure password lengths are greater than 14 character and include uppercase, special characters, and numbers.
The data for the containers PersistentVolumeClaims (PVC) in Kubernetes is mounted on /var/lib/rancher/K3s/storage/<dynamic-value>/ . This mount path may house unencrypted data depending on the methods used by the application or container. Ensure that if users are accessing this server, they have a proper Access Control List (ACL) applied to their user account to prevent accidental access to the files in the PVC. Always use the application’s encryption features if available.
The default HTTPS certificate provided by Traefik used in this Sample Solution will result in a warning message (“Your connection is not private”) in most web browsers when trying to access the applications hosted on the DAIR instance (e.g., Jenkins). For any production environment, a valid HTTPS certificate should be acquired and installed for the web application.
Networking
Running the Zaproxy from the cloud to a target with a public IP will generate outbound or egress network traffic. This traffic may be covered by the cloud provider’s free-tier agreements but if not, will result in egress traffic charges. Verify the location of the Zaproxy application with respect to the target web application. Some network scanners will suspect the activities from the Zaproxy to be malicious in nature. Ensure that proper security advice is followed before performing any scans by checking with the cloud provider’s policy to ensure application scanning is permitted.
Scaling
The Sample Solution uses the lightest VM possible; however, this will impede SAST scanning times if multiple projects are being analyzed. Start with vertical scaling by adding CPU cores and memory. If bottlenecks occur, consider using horizontal scaling defined by K3s.
K3s horizontal scaling requires setting up another node and connecting the new node to the cluster. Edit the YAML deployment files to increase the replicas. However, take into consideration which application is being replicated as each has their own clustering methods.
Availability
Refer to horizontal scaling outlined in the Scaling section above. One possible issue can occur when the load balance is located on one node. This may require moving the load balancer to another system.
API
All the technologies used in this Sample Solution contain a webhook/REST API. Ensure that a Security Group is applied to the deployment to prevent unauthorized access to the REST APIs.
The REST APIs can be used to create a centralized dashboard to help further enhance reporting within the organization and provide the ability to view all project security results on a single page or one view.
Zaproxy has a feature-rich API that allows you to perform most of the UI tasks via API calls. More information can be found from the following URL: https://www.zaproxy.org/docs/api/ .
License
The table below outlines the licenses per application in the Sample Solution.