Automate Cloud Orchestration with Kubernetes

If you haven’t already, please review the BigBitBus KAT DAIR BoosterPack Flight Plan, Automate Cloud Orchestration with Kubernetes, before implementing the Sample Solution below.

Introduction

The KAT Sample Solution is the result of lessons learned while effectively using Kubernetes in our own organization for software development and production deployments. This, coupled with our experience in Kubernetes IT consulting with multiple SMEs, is captured as code and documentation in the KAT. We hope this learning resource – our Sample Solution and Launch Codes – will give you the essential tools to be successful in your own Kubernetes and cloud native initiatives.

Note: We highly recommend that you first consult the latest KAT documentation on our GitHub repository to get acquainted with many of the concepts mentioned in the Sample Solution below.

Sample Solution

Solution Overview

The heart of this Sample Solution is an end-to-end illustration (described in code and documentation) of a software application developed and deployed in a Kubernetes environment. This Sample Solution illustrates an API microservice and single-page “To-Do” List Application called “todos” (Django Python for the API and Vue.js for the front end) deployed into a single-VM Kubernetes cluster inside the DAIR Cloud. You can install the entire application and all the supporting subsystems and processes into a single VM. We also provide tooling for developers to install KAT on a moderately powerful developer PC so that you can see how this can be integrated into your development workflows. Our todos example application can also be run via plain Docker so that you can compare the familiar Docker workflow with a Kubernetes approach.

In addition to the source code provided, the KAT Sample Solution contains infrastructure-as-code to set up Kubernetes resources that support the application. The Kubernetes cluster is set up using Microk8s as a single-node Kubernetes installation inside the VM. A brief description of the Kubernetes-based supporting subsystems is provided below:

SubsystemDescription
Storage/StateThis component illustrates how to deploy a stateful component; in the example, the Postgres database hosted within the Kubernetes cluster using persistent volume storage abstractions of Kubernetes.
Ingress and ServicesThese components explain how external (North-South) application traffic is routed within the Kubernetes cluster and into the deployed applications.
NamespacesBy separating components into namespaces, we demonstrate how the Kubernetes cluster can be shared safely by multiple microservices.
Secrets ManagementThis illustrates how to store passwords and other sensitive information.
DeploymentsDeployments are an important part of the CI-CD process within Kubernetes; we will install the software application as a deployment so that operational tasks like rollbacks, high-availability, etc. can be built around the application.
Release ManagementWe illustrate software releases and features such as rollback to illustrate some important operational aspects that Kubernetes provides. Helm will be used for this purpose.
MonitoringWe use the standard Prometheus/Grafana monitoring stack to monitor Kubernetes and the application components.
Auto-scalingThe horizontal pod auto-scaler will show users how the Kubernetes control plane manages auto-scaling.
Resource limitsKubernetes provides cgroups-based service isolation so that a bug such as a memory leak does not affect all other services hosted on the worker node(s). We show how Kubernetes resource limits achieve this goal.

All the above subsystems will be configured via Kubernetes Helm Charts. We show how Skaffold is used to deploy the application Helm Charts.

Fig.1 illustrates the Sample Solution. Developers build the application software (contained within the big white rectangle in the picture) using Vue.js for the single-page application (front end), Python Django (API back end) and a Postgres database. The BoosterPack provides all the code for this sample application as well as the method to create Docker images for both the front end and the API back end. These images will be pushed into an image registry via the Skaffold tool.


Sample Solution Overview Diagram

Fig. 1 – Sample Solution

Component Descriptions

Components used in the solution are summarized in the table below.

ComponentSummary
Kubernetes Infrastructure-as-CodeApplication-specific Helm Code and Kubernetes manifests for creating and updating application deployments, configmaps and secrets management, horizontal pod auto-scalers per component, supporting infrastructure like Kubernetes storage for database, monitoring and ingress resources, as well as operational issues like resource limits and namespaces.
Kubernetes Microk8s ClusterA single-node Kubernetes installation on a DAIR Cloud virtual machine.
Modern Web ApplicationA representative To-Do list application with a front-end (Vue.js), back-end (Django REST framework), and a PostgreSQL database.
NGINX Ingress ComponentThe NGINX Kubernetes traffic ingress component provides L7-routing capabilities.

https://GitHub.com/kubernetes/ingress-NGINX

Helm Package ManagerWe will use standard Helm Charts for PostgreSQL, Prometheus, Grafana, and Python as well as customized Helm Charts to deploy and manage our application stack. https://Helm.sh/
GitHub Infrastructure-as-Code (IaC) RepositoryPublicly accessible Git repository hosting the application and Kubernetes IaC.
Grafana + PrometheusA modern Kubernetes-friendly monitoring and alerting system.

Technology Demonstration

The following graphic shows the application components deployed into the Kubernetes cluster. A detailed description of each of the components, along with links to documentation describing each in detail, are provided in the table below. Again, we encourage you to read through the up-to-date documentation and code within the KAT GitHub repository to best understand the entire solution.

Fig 2: KAT components deployed into Kubernetes
LabelDescriptionExploratory commandsLink to Code
1(a)The back-end todos API Kubernetes service. This is load-balancing all requests coming to the /djangoapi/ endpoint to two back-end pods in this picture. This is a ClusterIP type service.kubectl -n be describe serviceAPI service template in Helm Chart
1(b)The back end todos API deployment has created a replica-set that in turn has defined two pods for the Django API.kubectl -n be get po -o wideAPI deployment template in Helm Chart
2(a)The todos database service. Note: this is an “internal” ClusterIP service and the Django API pods 1(b) connect to this service exposing port 5432.kubectl -n pg describe svcPostgres Helm ChartKAT Postgres values file
2(b)The postgres database pod. This pod uses a persistent volume to persist the database.kubectl -n pg describe poPostgres Helm ChartKAT Postgres values file
3(a)The front-end Vue.js single-page application todos service. This load-balances requests on the /frontend/ endpoint to two front-end pods serving the Vue.js files in this picture. The service type is ClusterIP.kubectl -n fe describe svcFront end service template used to render a Kubernetes YAML manifest based on the values passed into Helm.
3(b)The front-end pods – these are NGINX pods that serve up the Vue.js code files. This is a stateless application since it is not connected to the back-end API; the client loads up the application on their browser and then directly talks to the back-end API at /djangoapi/.kubectl -n fe describe deploy; kubectl -n fe get po -o wideFront end service template used to render a Kubernetes YAML manifest based on the values passed into Helm.
4(a)The Kubernetes dashboard service; this forwards requests coming to /dashboard/ into the dashboard pod.kubectl -n dashboard describe svc; kubectl -n dashboard describe endpointsDashboard Helm ChartKAT Dashboard values file
4(b)The Kubernetes dashboard pod. Note: it is not replicated, so it is not a highly available service.kubectl -n dashboard describe poDashboard Helm ChartKAT Dashboard values file
5(a)The Grafana dashboard servicekubectl -n monitoring describe service grafanaThe Prometheus stack Helm ChartKAT Prometheus stack values file for Helm.
5(b)The Grafana podkubectl -n monitoring describe po grafanaThe Prometheus stack Helm ChartKAT Prometheus stack values file for Helm.
6(a)The Prometheus time-series metrics server service. Note: it is not exposed externally via the ingress, but is an internal service consumed by Grafana.kubectl -n monitoring describe pod Prometheus-serverThe Prometheus stack Helm ChartKAT Prometheus stack values file for Helm.
6(b)The Prometheus server pod. Note: it uses a persistent volume to store the metrics.kubectl -n monitoring get po -o wide; kubectl get pv; kubectl -n monitoring get pvcThe Prometheus stack Helm ChartKAT Prometheus stack values file for Helm.
7The Ingress. This is where all HTTP requests enter the Kubernetes cluster and are appropriately routed into /frontend, /djangoapi, /dashboard/ or /monitoring-grafana. This is also where you would terminate SSL in production and/or interface with your cloud provider’s load balancer, so ingress is usually a very important aspect of any application setup in Kubernetes.kubectl get ingress –all-namespaces -o wideNGINX Ingress documentation

What this Sample Solution is Not

Here, we highlight some of the limitations of this BoosterPack and provide documentation links that overcome these limitations.

  1. Enterprise Level Security: We touch upon some of the security aspects in a later section but to get a hardened, production-ready, multi-user cluster there are additional considerations and steps to be completed. We have provided links to Kubernetes security documentation. Another useful option may be to buy a managed Kubernetes service that many cloud providers offer, which can provide many out-of-the-box security features.
  2. Multiple users: Role-based access control (RBAC) is enabled in the Microk8s cluster in the KAT Sample Solution and used by some of the service accounts in the Helm Charts. However, you are encouraged to read more about RBAC to enhance your understanding of roles and permissions when multiple users are connected to a Kubernetes cluster.
  3. Multi-node considerations: KAT runs on a single VM, therefore multi-node aspects of a Kubernetes installation are not considered here. For example, affinity, taints, and tolerations influence the Kubernetes scheduler to favour one worker node over the other when installing pods into the cluster.  Experienced users may want to read about the multi-node Micork8s extension here  to try a multi-node setup (although we do not provide support for this configuration).
  4. Cloud-Provider Integrations: Cloud providers offer custom extensions to Kubernetes for operational ease. For example, Amazon AWS, Microsoft Azure, or Google cloud load-balancers can be created via the external load-balancer abstraction of Kubernetes services. We highly encourage users to explore any custom integrations that their cloud providers have worked on for Kubernetes in their own systems.

How to Deploy

If you’re a DAIR participant, you can deploy the KAT Sample Solution by navigating to the Kubernetes Automation Toolkit link and following the instructions on that page for deploying a new instance of the Sample Solution.

Configuration and Application Launch

Before you deploy, we assume the following are already setup in your DAIR Cloud account:

  1. You have set up a security group that allows you to SSH (TCP port 22) into VMs that are spun up in the DAIR Cloud from the IP you are accessing the VM.
  2. You have set up your SSH key pair to log into DAIR VMs.

You must be able to create a Linux VM in the DAIR Cloud and log into it via SSH before proceeding further.


To deploy the KAT Sample Solution on a DAIR VM:

Log in to your DAIR AWS account with instructions provided to you by the DAIR team.

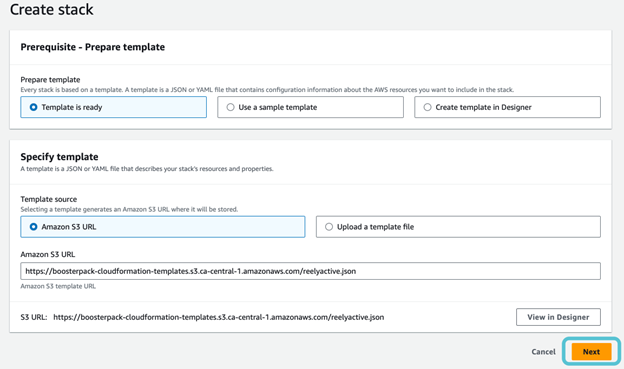
Click DEPLOY to launch the BoosterPack using AWS CloudFormation stack.

You can also find a DEPLOY link for each Sample Solution in the BoosterPack Catalogue.

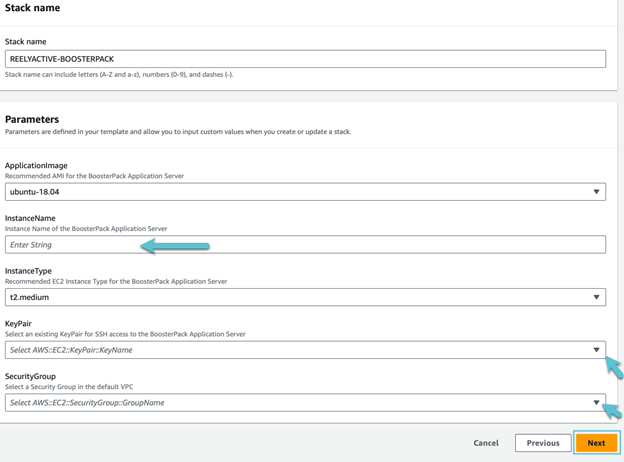
Click Next to go to CloudFormation step 2 and fill out the parameter configuration form. In the “InstanceName” field, type in a unique instance name for your application server and then complete the rest of the form using the drop-down options. Please note that other parameters (such as “ApplicationImage” and “InstanceType”) are pre-configured and cannot be modified.

Once you are done, click Next to go to CloudFormation step 3. This section is for configuring additional/advanced options which are not required in our use case. Click Next at the bottom of the page to skip step 3 and get to the final CloudFormation, step 4.

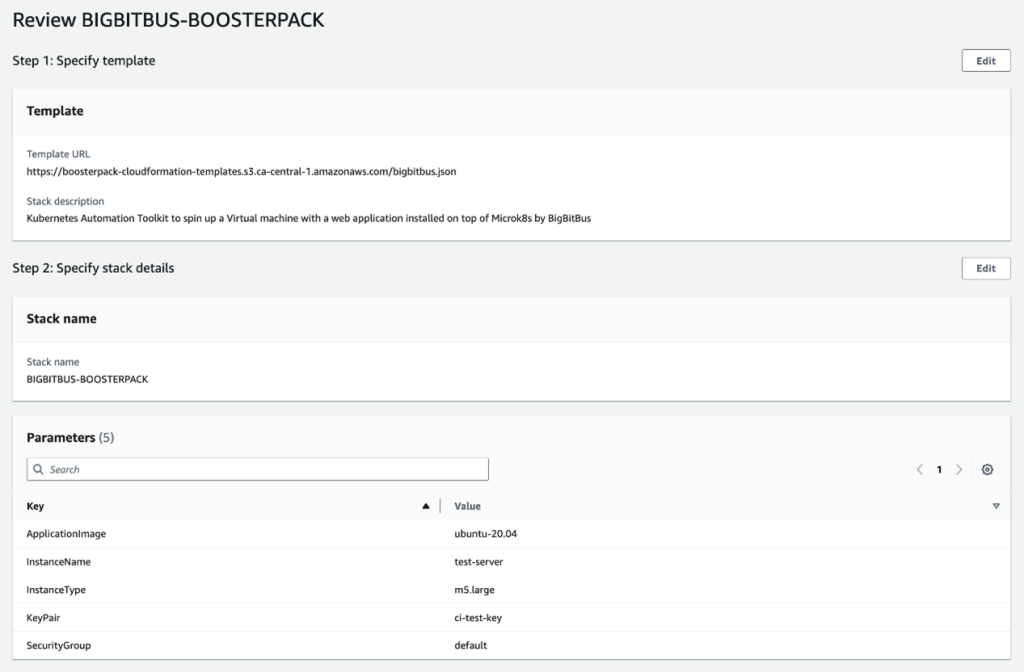
The final section allows you to review existing BoosterPack configurations and provides options for making configuration changes, using the “Edit” button, if needed. Once satisfied with the existing configuration, click “Submit” at the bottom of the page to deploy the BoosterPack.

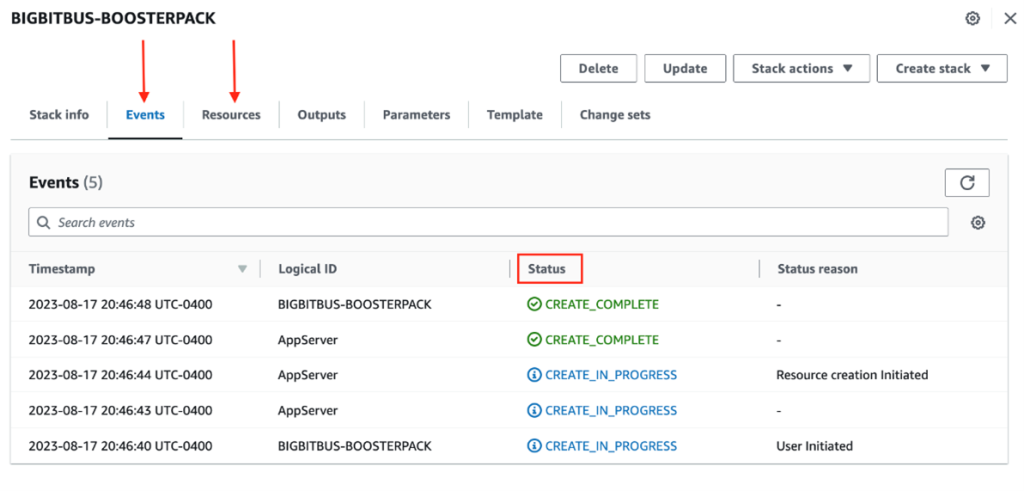
The BoosterPack deployment will start by creating a new instance followed by the deployment automation.

Please note, you can only monitor the status of the AWS instance through the “Events” and “Resources” tab of the CloudFormation page and you will need to subsequently log in to the application server to confirm the deployment automation status.

Also, be sure to record the IP address value found under the “Outputs” tab of the BoosterPack CloudFormation page. This is the external IP of the BoosterPack instance. You will need this IP address to log in to the server using SSH and access the web interfaces of the sample application.

From a shell/terminal that has SSH enabled, log in to the application server with the following SSH command:

ssh -i key_file.pem ubuntu@Public_IP

Replace “key_file” with the private key of the SSH key pair selected in the parameter configuration form and replace “Public_IP” with the IP Address value obtained from the CloudFormation output.

Once successfully logged in to the application server, you can monitor the status of the deployment automation script with the following commands:

source /etc/profile.d/boosterpack.sh

tail -f /var/log/boosterpack.log

Make a note of the user token value (copy to clipboard) as you will need it to access the Kubernetes dashboard later. You can also obtain this token from the BoosterPack application server using the following command:

sudo microk8s config

The next step involves setting up port-forwarding from port 8080 on your PC to port 80 inside an SSH tunnel to the provisioned DAIR VM. This step ensures secure access to where all the HTTP services of the KAT Sample Solution are made available. 

The following is the Linux/Mac command to set this up:

We are using the SSH command line to create a tunnel from localhost:8080 on our PC to localhost:80 on the DAIR VM via its external IP.

ssh -i key_file.pem ubuntu@Public_IP -L 8080:localhost:80 -N

Alternatively, to set up such SSH port forwarding with the Putty tool in Windows, follow this guide: 

https://docs.bitnami.com/bch/faq/get-started/access-ssh-tunnel/

Note: If you are using Putty, remember to forward localhost:8080, NOT localhost:8888 as illustrated in the guide.

Testing KAT Sample Solution Installation

REMEMBER: Trailing “/” slashes matter in the web URLs below!

1. Open a web browser and navigate to: http://localhost:8080/frontend/
This will connect you to the Vue.js todos List front-end service.

You should see a Todo List application; try to add a few todo items and confirm the list grows/shrinks as you enter/remove items; you can also edit items by double clicking.

Significant components used in the Sample Solution are summarized in the table below:

2. Next, let’s confirm we can reach the Django API service. In another browser tab navigate to http://localhost:8080/djangoapi/apis/v1/ . This should connect you to the browsable Django API. You should see the items you entered in the front-end (Step 1 above) in JSON format.


3. Next, open the Kubernetes Dashboard by navigating to: http://localhost:8080/dashboard/  When prompted, use the token from the configuration output (Step 11 in the Deployment Section above) to log into the dashboard. You will now be able to browse the Kubernetes cluster deployed to the DAIR VM. Below is a screenshot of what you should see.

4. Finally, navigate to http://localhost:8080/monitoring-grafana/ to log into the Grafana monitoring service. You can log in using the default credentials as follows:

username: “admin”
password: “prom-operator”


5. To get a sense of what can be monitored in your Kubernetes cluster, navigate to the Manage Dashboards menu on the left and click on the “Kubernetes / Compute Resources / Cluster” link as highlighted in the screenshot below.


6. You should see the following dashboard with various cluster metrics in view. You can customize (edit) this dashboard or create your own as you see fit.


Congratulations, you have successfully deployed the KAT Sample Solution!

We highly recommend you navigate to the GitHub source code and documentation repository to learn more about each KAT component and learn about Kubernetes and application deployments into the KAT environment:

https://GitHub.com/BigBitBusInc/kubernetes-automation-toolkit

Termination

When you have finished experimenting with the KAT Sample Solution, you will want to delete the instance it was running on to reduce your monthly budget spend in AWS.

To terminate the solution and release any resources it consumes, return to the CloudFormation stacks page and delete the stack corresponding to the BoosterPack. More information about deleting a CloudFormation stack can be found here.

Technology Considerations

We discuss some of the salient features of the KAT Sample Solution below. We highly recommend that you check out the latest detailed documentation on the BigBitBus Kubernetes Automation Toolkit open-source repository:

https://GitHub.com/BigBitBusInc/kubernetes-automation-toolkit

Deployment Components

Skaffold

An automated build tool for Kubernetes applications developed by Google. It handles the workflow for building, pushing, and deploying an application. This enables developers to focus more on developing instead of building and deploying. Skaffold deployments are based around a “skaffold.YAML” file which contains information such as the Docker image to use when building the container, path to the application, target environment to deploy it into, etc. Running this file will allow Skaffold to watch a local application directory for changes which, upon change, will automatically build, push, and deploy to a local or remote Kubernetes cluster. Read more here: https://skaffold.dev/docs/

In the scope of this sample, Skaffold allows us to develop the Django back-end and Vue.js front-end without having to use time on deployment configurations such as Kubernetes manifest files or rebuilding images. A quick “skaffold run” builds the application and deploys it within the Kubernetes cluster and tracks it for change.

Helm

A package manager for Kubernetes. It is essentially the equivalent of Yum/Apt for Kubernetes applications. Helm deploys and creates Helm Charts, which are structured packages that are built on top of Kubernetes architecture. Helm Charts create a simple, standard structure of Kubernetes manifests that are required for a deployment. After adding the chart to the local Helm repository, deployment to the Kubernetes cluster is then made simple with a quick “Helm install [Helm Chart]” command. Read more here: https://helm.sh/docs/

In the scope of this BoosterPack, Helm Charts were made for the back-end and front-end applications to conform to a structure that other components were using. Helm was also used to install the PostgreSQL database from Bitnami, the Prometheus Operator, and Grafana.

Prometheus & Grafana

Responsible for monitoring the activity within a Kubernetes cluster. Developed by SoundCloud, Prometheus aims to create an all-in-one solution to visualize and log data that is being transferred within a cluster. Its key features include advanced data models for Kubernetes resources, a flexible query language, and multiple modes of graphing and dashboarding. Grafana is visualization software that allows users to better understand what is going on within a Kubernetes cluster. Grafana supplies data visualization in terms of graphs, charts, metrics, and maps which simplifies the overview of a complex cluster.

Grafana has built-in support for querying Prometheus. It takes the data that Prometheus picks up and display them in an organized manner to the user through a GUI. Through the GUI, the user can track the activity of resources within a given namespace in the target cluster.

Application

Vue.js Application

An open-source JavaScript framework that focuses on building UIs. It incorporates the reactive aspect of web design which connects the JavaScript to the HTML component of the code. If data change happens within the JavaScript component, the UI (HTML/CSS) automatically re-renders.

In the scope of this BoosterPack, the Vue.js application acts as a single-page front end. It is a GUI that simply allows users to make the standard RESTful API calls to the back-end without having to directly interact with it.

To make the API calls, the application uses a tool called “Axios” within the JavaScript library. It sets up the basic HTTP request format that is sent to the back-end server when a call is made.

MethodDescription
GETWhen the page is loaded up, the application will automatically run a GET request which will retrieve any outstanding todos on the database.
POSTA text box with the question “What needs to be done” will prompt the user to enter a  todo.
PUTDouble clicking on an outstanding todo will prompt the user with the ability to edit the todo. ESC will cancel the edit.
DELETEHovering over the outstanding todo and clicking the red “x” will remove the todo from the list.

The CSS used by our implementation was derived from this CSS template:

https://GitHub.com/Klerith/TODO-CSS-Template

The directory that holds all the Vue.js files is within the path:

https://GitHub.com/BigBitBusInc/kubernetes-automation-toolkit/tree/main/code/app-code/frontend/ToDo-vuejs

The underlying code that is shown to the user is further within src/App.vue. Here we see the basic HTML/CSS components stored within <template> tags and the JavaScript component stored within the <script> tags.

Read more about Vue.js: Introduction — Vue.js

Django Application (API back-end)

An open-source Python web framework that sets up a project’s fundamental components of a web application. This allows users to spend more time on development instead of deployment. The syntax is easy to understand and includes the core architecture of a web server.

In the scope of the BoosterPack, the Django application acts as the back end providing the todos API. It handles the API calls and sends/retrieves information from the database.

When the application starts up, it creates a model called “todo” that contains attributes such as the title and description of a single todo item. This is the core object that the application is based on. The application establishes a connection with the database and sends the model information through a database migration. The database will then create a table which stores these todo objects.

Using Django’s “DefaultRouter” as the router, the application automatically maps HTTP requests sent by the front-end against a queryset of all the todo objects through a “Viewset”. A “Viewset” uses model operations such as list, create, update, and destroy that change the contents of the database when the model objects are changed. For example, when a todo is added through the Vue.js application, the router takes the request, maps it according to its method and sends it to the “Viewset”, which handles the request using a “create” model operation. When the list of todo objects changes, the reactive aspect of the Vue.js application also updates its page.

We derived our todos API code from this original location: GitHub – wsvincent/drf-todo-api: Django REST Framework Todo API Tutorial

The directory that holds all the Django code files is within the path: kubernetes-automation-toolkit/code/app-code/api/todo-python-django at main · BigBitBusInc/kubernetes-automation-toolkit · GitHub

Read more about the Django REST framework: https://docs.djangoproject.com/en/3.1/

Other Considerations

Security

The DAIR VM running the Kubernetes cluster that hosts our todos application is only accessible on port 22 (SSH). We use secure tunnelling from our PC into this VM to explore the application and Grafana endpoints. We also patch the Ubuntu VM automatically when it is provisioned via the Application Blueprint.

All Helm Charts within this sample contain commented-out TLS/SSL code-blocks that can be activated once you obtain a valid TLS certificate for your domain. In the real world, you would not connect via a SSH tunnel but instead use TLS encryption to connect via the secure HTTPS protocol. The “values.YAML” files contain commented-out sections to use your own SSL certificates when it is time to deploy this for external user access.  For more information on how to work with TLS and Ingress start here.

In the KAT Sample Solution, we have used the root-admin Kubernetes credentials and granted them to the user within the VM. In reality, for any production cluster where multiple users/services access Kubernetes, the best practice is to set up role-based access control. We encourage you to consider the many aspects of security before using Kubernetes in a production environment.

We have used Kubernetes secrets (for example, to store the Postgres password and pass it into our Helm Chart); it is recommended to use Kubernetes Secrets instead of plain text configmaps when sensitive data is stored in Kubernetes.

If you are interested in learning more about Kubernetes security, here are some excellent resources to get started:

  1. Kubernetes official documentation: Securing a Cluster https://kubernetes.io/docs/concepts/security/ 
  2. Automating Certificate Management in Cloud-Native Environments via Cert-Manager https://cert-manager.io/

Networking

As mentioned earlier, we use NGINX Ingress to expose the application endpoints to the outside world. Once the DAIR VM has been created, open an SSH tunnel on local port 8080 that connects to the HTTP port 80 on the DAIR VM.

After this, the user can access the application’s components via their PC web browser at these locations; please note that trailing forward-slashes are not optional!

Endpoints (after connecting via the SSH tunnel on localhost:8080)

todos Front endhttp://localhost:8080/frontend/
API Back endhttp://localhost:8080/djangoapi/
Grafana Monitoringhttp://localhost:8080/monitoring-grafana/
Kubernetes Dashboardhttp://localhost:8080/dashboard/

We use the NGINX Ingress Controller in the KAT Sample Solution. This opens up a ton of possibilities in configuring Layer-7 networking and routing requests. We are using the NGINX server as a reverse proxy and load balancer. NGINX is extremely versatile and comes with many options to shape your traffic.

Learn more about Kubernetes NGINX Ingress here.

Scaling

The “values.YAML” files in the Helm Charts for the front end and the back end have a parameter called “replicas” that can be adjusted for scaling the number of replicas. Additionally, the Kubernetes Horizontal Pod Autoscaler is enabled so that the number of replicas automatically scale depending on the CPU usage in the pods. Please refer to the “values.YAML” files in the Helm Charts to understand how these parameters are configured. You can experiment with setting the number of replicas in each of the deployments’ values.YAML file.

Availability

Kubernetes can create multiple pods running the same software – for example, our Django API back-end or Vue.js front-end – so that the application becomes highly available. This pattern is particularly important when using a multi-node Kubernetes cluster. For example, by running the todos application in a multi-node Kubernetes cluster, if one node fails, the application stays alive on the other node(s) and Kubernetes will automatically detect and restart the down node. This is transparent to the end-user of the application and greatly simplifies the engineering effort to operate and sustain applications in a highly available production environment.

Cost

The size of the Kubernetes cluster is usually proportional to the number of worker nodes in the cluster. For the KAT Sample Solution, we are simply using a single node cluster on a single virtual machine. In the real world, we have multiple control and worker nodes, as well as networking and load-balancing costs that can significantly grow as the cluster is scaled up. To get an idea of how much a “real-world” Kubernetes cluster can cost, we recommend using one of the public cloud cost calculators (see link below).


License

All components of the KAT Sample Solution are subject to open-source licenses; please refer to their respective source repositories to learn and read about the licensing terms. The KAT BoosterPack code and documentation license is available here:

https://GitHub.com/BigBitBusInc/kubernetes-automation-toolkit/blob/main/LICENSE.md

Source Code

The updated source code can be found here:

https://GitHub.com/BigBitBusInc/kubernetes-automation-toolkit

Glossary

The following terminology, as defined below, may be used throughout this document.

TermDescriptionLink/further Reading
DjangoPython-based free and open-source web framework
HelmA package manager for Kubernetes
KubernetesAn open-source container-orchestration system for automating computer application deployment, scaling, and management
Microk8sA lightweight, production-ready Kubernetes distribution
PostgresSQLAn open-source relational database management system
Prometheus and GrafanaTime series database and metrics querying system and UI
SkaffoldA build and deploy tool for Kubernetes
Vue.jsAn open-source front end JavaScript framework for building user interfaces and single-page applications