Have we been hacked?!?
A cyberattack can be disastrous for any organization, so it’s important to be aware of the steps to follow and programs you can use to prevent or recover a compromised instance. Having a plan is crucial – here, we’ll focus on preparation. When an instance is hacked, you are less likely to know you’ve been compromised without a proper plan in place. Having a plan means you can revert to a previous state quickly, easily, and hopefully with the knowledge of where the attacker came from.
Just show me how to recover my OpenStack instance.
Detection Event
Let’s assume that you’ve noticed unexpected or suspicious activities on your instance, or you’ve otherwise been informed by the DAIR Admin team of a possible incident. It’s time for you to spring into action. There 2 critical steps you can take to confirm a compromised account and quickly identify the problem: (1) check your users, and (2) check your system.
1. Checking the Users
A few questions you should ask yourself:
- Is there anything out of the ordinary?
- Are there any weird permissions set on programs?
- Has an account been trying to run things as sudo and failing?
Try these useful commands:
| Function | Command |
|---|---|
| To see who is logged in? | $ who |
| To check permissions on programs list and last time permissions of file changed (for /var/log enter the path you want to investigate) | $ sudo ls -lc /var/log |
| To log permission changes | $ sudo auditctl -w /var/www/foo -p a |
| To install Auditd | $ sudo apt update && sudo apt install auditd |
Any attributes changed will be logged. Please note:
- -w means to watch the file/folder
- -p a means watch for changes in file attributes (permissions)
Below is an example of what the log file will look like when you run this type of command:
tail -f /var/log/audit/audit.log.
type=SYSCALL msg=audit(1429279282.410:59): arch=c000003e syscall=268 success=yes exit=0
a0=ffffffffffffff9c a1=23f20f0 a2=1c0 a3=7fff90dd96e0 items=1 ppid=26951 pid=32041
auid=4294967295 uid=0 gid=0 euid=0 suid=0 fsuid=0 egid=0 sgid=0 fsgid=0 tty=pts5
ses=4294967295 comm="chmod" exe="/bin/chmod"
type=CWD msg=audit(1429279282.410:59): cwd="/root"
type=PATH msg=audit(1429279282.410:59): item=0 name="/var/www/foo" inode=18284 dev=00:13
mode=040700 ouid=0 ogid=0 rdev=00:00
The last two points are common ways an attacker will gain access to your system. Often, hackers connect via less secure users or services and then leverage exploits to change their permissions and grant themselves wider access.

2. Check Your System Usage
Use system tools like uptime and top to check your instance load and see if any services are using abnormally high resources. Attackers will try to mask their activities under services that blend into the environment. Do an online search for any services that are unfamiliar to you. You should treat it as suspicious if you can’t find any information on that service from a reputable source. Attackers may be looking to use computing resources (e.g., crypto mining on GPUs) but may also be looking for your data for various reasons (e.g. ransomware).
To get a dynamic real-time view of your system, run the top command: $ top
Check here for additional guidance.
Additionally, check your authorized users file, and previous logins to your instance (e.g., via last or log file like /var/log/auth.log).
Ask yourself: Are these normal? Is there a new entry you don’t recognize? These can be tell-tale signs of a compromised system.
$ tail 1000f /var/auth/log
So, you’ve confirmed that you’ve been hacked…
Response Plan
Our next step is to mitigate the damage and restore your instance to a secure state. The effectiveness of your response plan can be greatly improved through planning and following sound cybersecurity principles to make your life easier in the event of a security breach.
1. Isolate your instance.
First, isolate the hacked instance from any other connected or communicating instances. Attackers know how to use instances in your environment to access other instances on your network. If this is a ransomware attack, ransomware authors know how to encrypt things like attached storage, and object storage.
Turning off your instance and reporting the issue to CANARIE’s DAIR Admin team are key steps to take should your instance be compromised.
2. Verify your data on the instance.
Check your dataset and/or databases to verify the authenticity of the data, ensuring nothing has been added, deleted, or modified in any way. If you can detect when your data was first tampered with, you can use that information to determine your last known “good backup” to be used as a restore point.
3. Verify your backups.
Hopefully, you have been keeping frequent backups which is another wise practice. Find your latest backup of a “known good” state. It’s good to keep an eye on your stored backups. For example, if your data is automatically backed up every day at the same time, verify that the timestamp of your latest “good backup” correlates with the backup time you defined – this a good indicator that your backup has not been tampered with.
When in doubt, delete the instance.
Unfortunately, rebuilding your instance is the recommended, safest, and best way to recover from a hack. Fortunately, if you follow best practices and leverage the power of infrastructure as code, this can take as little as a few minutes. By deleting and redeploying your instance, you significantly reduce the risk of compromise if the hacker has created one or more backdoors for future access or injected malware that goes undetected and is to be activated later.
Backup Options
Given how important it is to have backups to recover – we next want to cover some of the options most used with cloud computing infrastructure.
Data Backups
There are several methods you can follow to ensure that your data is backed up to create a historical timeline of your data. One is by managing compressed copies of database backups to a separate and secure volume or other storage service (e.g. S3). Another way is to create snapshots of your entire system. There are advantages and disadvantages to both approaches.
A snapshot is like a picture in time of your server. You can use a snapshot to build an identical server with the same setup, and same items running as when it was taken. This is why multiple versions of snapshots are important. Consider configuring Auto snapshots in AWS.
Having multiple snapshots, gives you the flexibility to revert to your choice of multiple points in time. This is extremely useful when you are certain of the attack’s date.
One of the bigger tradeoffs is that unlike data backups, there is a higher likelihood a snapshot backup may have the malware installed meaning the compromise will happen again. However, at the same time a snapshot saves one from having to reinstall and reconfigure their software.
Off-site backups
What’s better than having a good backup? Having multiple good backups. Always have several backups of your images or data stored off site. This extra layer of security comes in handy in the event of a major outage with your cloud provider.
What if your Administrator account in AWS was compromised? Maintaining your backups with a third-party backup service is the ideal way to keep your data safe.
Recovery
Once you have learned more about what or how you were compromised, you can begin the recovery process. As mentioned above, our strong recommendation is to rebuild the instance from scratch unless you believe you have a snapshot created before the compromise occurred.
Recovering from data backups
If you have your data backed up, recovery can be done by creating a new instance, installing and configuring your software, and then reloading your data from the backup. Approaches such as infrastructure as code and configuration management help make this job easier.
AWS Snapshot recovery
Check here for information on how to recover your instance from an AWS snapshot.
Recovering from a Snapshot in OpenStack
Another alternative is to recover using a snapshot, follow this easy 6-step process in OpenStack (applicable to DAIR GPU users).
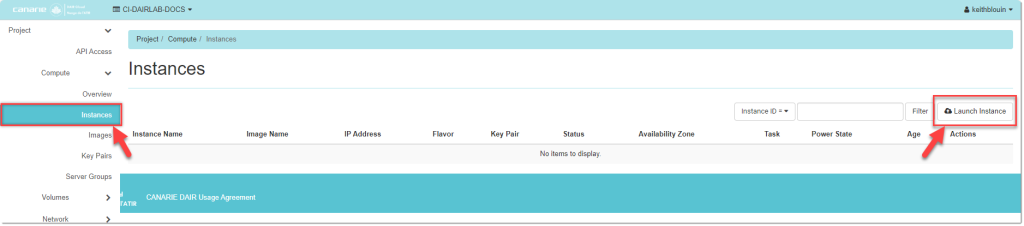
- Click on Instances from the left side panel and select Launch Instance.
- Enter your instance Details.
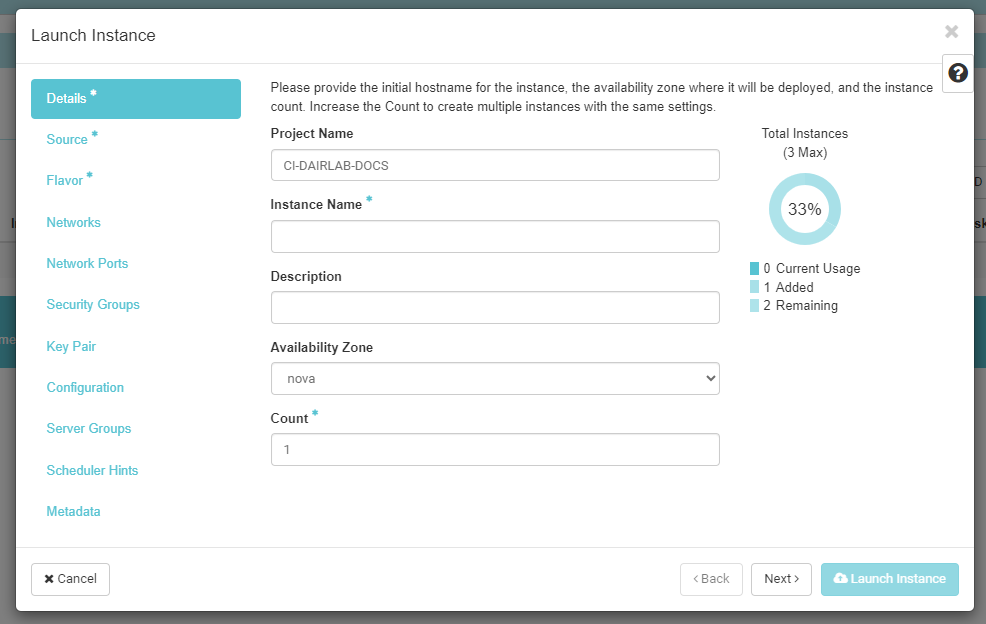
- Click Next
- On the Select Boot Source dropdown menu, select Instance Snapshot
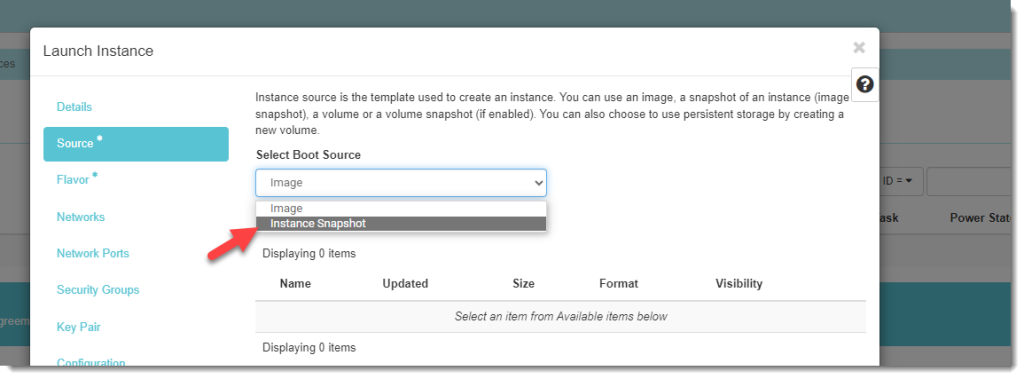
- Choose your snapshot by selecting the upward arrow button to the right of the listed snapshot.
- Click Launch Instance (bottom right) and your instance should be back up and running in a matter of minutes.
Instance-Loss Prevention Plan
Three preventative measures we recommend implementing to avoid loss of your instance(s) in the first place is to:
- avoid 0.0.0.0/0 rules on high-risk ports like RDP and SSH; and
- not have password-only accounts on your instances; and
- update and patch security issues daily!
The only way to have a recoverable instance is to have a clear understanding of what is installed and how it is configured. When you’re setting up any environment or creating any program, we strongly recommend thinking about how someone might break it.
To help, we need to ask ourselves the following questions:
- Is my server publicly accessible?
- What am I running on? A database? A webserver?
- Is it popular or supported for security updates?
- How should I backup my server?
- How should I backup my data?
- How can I keep track of the things running on my server?
Let’s discuss some of the fundamental areas of your instance that will help you identify whether your system has been compromised.
Logs, IDS, and SIEM
Your instance creates several logs that can be used to monitor activities on your instance. It’s recommended to review those logs regularly and/or use other services like an Intrusion Detection System (IDS) or a Security Information and Event Management (SIEM) system to identify and manage threats.
Major cloud providers offer their own solutions, for example AWS’ Detective service. Be aware that the effectiveness of SIEM or IDS services depends on how well they have been configured, and whether the logs are being tracked. Setting up this level of protection requires a bit of thought and effort. It’s important to ask yourself, “Am I tracking the right things?” to be sure you’re making the most efficient use of your resources. If you would like to learn more about SIEM or IDS, check out your SIEM or IDS provider’s documentation as each service is different.
Other Tools and Techniques
A few last things worth considering – both as preventative options and to enable earlier detection of unexpected behavior.
Tools
Intrusion Prevention Software
Software such as fail2ban are used to monitor logs for password stuffing or brute force attacks and to prevent unauthorized access. See Digital Oceans tutorial for guidance.
Monitoring and Metrics Software
Tools in AWS like Cloud Watch and Guard Duty can help monitor and alert. Solutions like this from AWS will notify you of state changes as well.
Monitoring tools like Grafana, Prometheus, Sensu, and Nagios can monitor your instance and help detect unexpected behavior. These tools can track several things, such as uptime, load, I/O, network traffic, and more. This type of tracking is recommended because it can help diagnose issues with your server, is quick to set up, and will provide solid evidence about whether you’ve been hacked or not.
Techniques
Principle of Least Privilege
This is the concept that any user should only have access to what is essential for them to perform their responsibilities and no more. It requires authentication before granting access to specific services, limiting that access to only those who require it.
Learn more about security best practices here and tips on how to harden your Docker here.
Firewalls and Authentication
A properly configured firewall and authentication practices will significantly help secure your instance and protect it from hacking. It is best practice to never use open 0.0.0.0/0 rules in SSH, RDP, Database ports, or Custom application ports for administration.
Specific IP rules for each administrator are required to limit your risk of being hacked.
Check out our DAIR Cloud security tutorial for more tips on approaching security in a modern cloud environment. In that tutorial, we outline a wide range of tools and techniques, such as network isolation, authentication, and different types of models and architectures, to keep your instance as secure as possible.