On this page
- Overview
- Before You Start
- Step 1 Installing the Base IdP and Webserver
- Task 1: Download and install the supported Java
- Task 2: Download and install latest Shibboleth Identity Provider
- Task 3: Download and install latest Jetty for Windows
- Task 4: Install JavaScript plugin to support dynamic elements
- Task 5: Update RAM IdP allocations for large aggregate processing
- Task 6: Update Jetty to use a commercially signed certificate for production use
- Task 7: Testing via status URL
- Step 2 Configure Authentication Settings
- Task 8: Choosing LDAP as an authentication strategy
- Task 9: Configuring LDAP
- Task 10: Download IdP configuration assistance tools to assist with LDAP configuration
- Task 11: Set the execution policy for PowerShell and fetch the LDAP server certificate
- Task 12: Verify authentication functions using Hello World app
- Step 3 Configure CAF Metadata trust
- Task 13: Fetch the FIM Signing Key
- Task 14: Adding CAF aggregates to your IdP
- Step 4 Configuring Attribute Resolution
- Task 15: Configure support for common LDAP attributes
- Task 16: Configuring support for eduPersonTargetedId
- Step 5 Configuring Attribute Release
- Task 17: Configure CAF recommended attribute release policies enabling for use with most services
- Step 6 Going live and testing
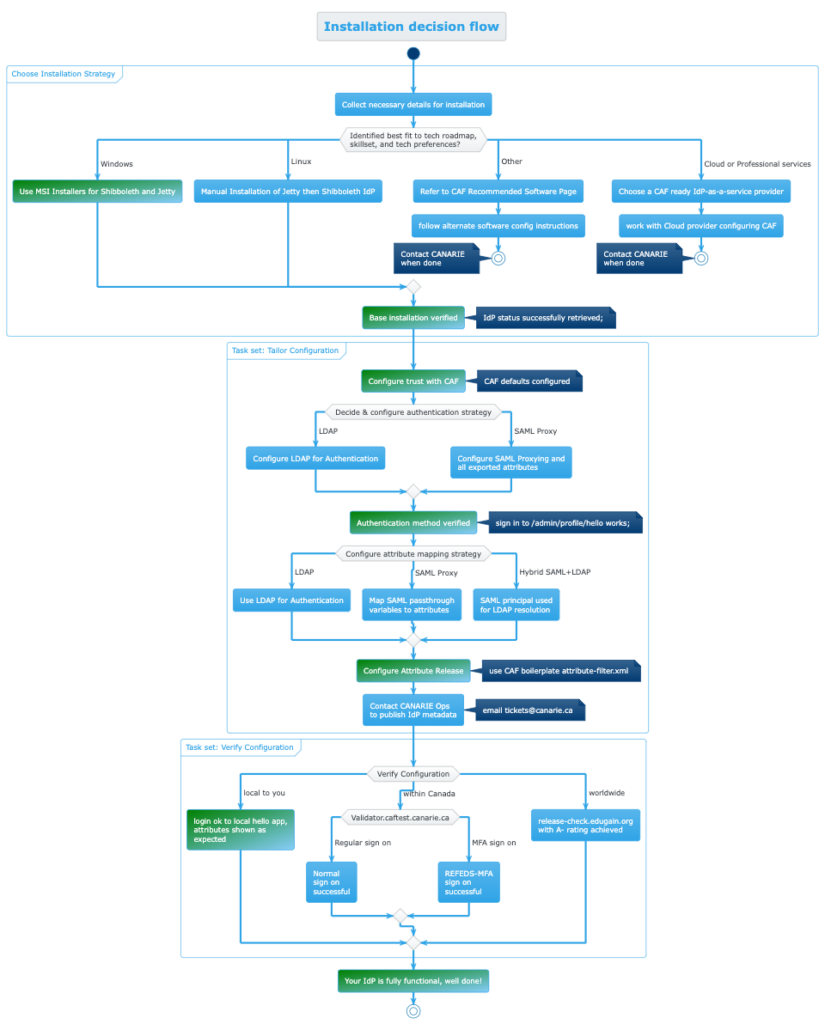
- Additional Material: IdP installation decision tree
Overview
This guide is a quick start installation of a Shibboleth Identity Provider (IdP) with the required CANARE CAF configuration.
After performing these steps, you will have:
- An operating Identity Provider
- The ability to sign-on to your on-premises Active Directory
- Recommended attributes configured
- Recommended CANARIE services ready to be used
Not all implementers work the same way or at the same cadence. The install steps are chaptered to jump to a relevant section and a visual decision tree of the entire process is available to assist in planning your installation.
Complementary to this guide, we recommend reviewing the following reference material:
Before You Start
The configuration steps assume the reader has some familiarity with system administration, can handle XML file configuration, and connect to their local directory. The steps are platform neutral and we recommend having these elements ready to speed up installation:
1. Your entityID
This refers to the URL you want to use to name your IdP, the installer will suggest one from your hostname unless one is specified.
Recommendation: (1) Use a service name such as ‘idp.yourdomain.ca’ to abstract away from machine names (2) Consider ‘idp-test.yourdomain.ca’ for a test instance. entityID and scope constraints can be found in CANARIE’s Metadata Registration Practice Statement, Section 5 Entity Eligibility and Validation
2. Your “scope” which is appended to scoped attributes
- often the same as your organization’s email domain
- can also be a third-level DNS subdomain
3. Necessary Credentials to bind to the AD’s LDAP endpoint if using LDAP
4. Understanding where you will do your work
- For pre-prod / prod:
- Latest Windows Server with 16gb RAM, 2 vCPUs minimum
- For rapid testing
- Your own dedicated server; and
- Windows Sandbox
Note: There is no persistence unless you configure mount points outside the sandbox.
In addition to the software installed below we strongly recommend a text editor with syntax highlighting and multi-tab support such as Notepad++ and for testing LDAP connectivity, Softerra’s free LDAP browser to independently verify LDAP configurations if necessary.
Step 1 Installing the base IdP and webserver
(est. time: 15 min)
Task 1: Download and install the supported Java version
Fetch and install the Amazon Corretto 17 for Windows via MSI.
Note: If the IdP and Jetty installers complain about Java not being installed, starting the MSI packages from a command prompt will ensure the newest environment configuration is picked up correctly. This issue self-resolves after a reboot.
To verify installation, open a cmd.exe window and confirm you see the version of java the MSI installed with Java -version
Task 2: Download and install latest Shibboleth Identity Provider
New installations will have a newer $idp_home as C:\opt\shibboleth-idp\
When asked about ’Configure for Active Directory’, tick the box and enter the hostname idp.domain.ca/idp-test.domain.ca and chosen scope.
Note: If using WindowsSandbox record the offered name to use later within the sandbox’s browser as the name will change with each invocation of the sandbox.
Next page is Configure Active Directory where you need to:
- Specify your AD domain
- Offer a UPN for the privileged account the IdP uses
- The password for this account
Task 3: Download and install latest Jetty for Windows
This will install Jetty as the Windows Service Shibboleth IdP Daemon which is named shibd_idp uses an Apache ProcRun.
You have the option to run Jetty as another user with a default of unchecked being ok if that aligns with your practices. Run As details are on the Shib Wiki. If selected, future updates may have extra steps to set permissions and privileges accordingly.
Task 4: Install JavaScript plugin to support dynamic elements
The IdP needs a JavaScript engine and JDK15 and later no longer ship the libraries so we need to add our own JavaScript libraries. We recommend Nashorn for a JavaScript engine which can be added with these steps:
- Stop the IdP so that the build update will run properly:
sc stop shibd_idp
Use an Administrator level cmd.exe window for this task: c:\opt\shibboleth-idp\bin\Plugin.bat -I net.shibboleth.idp.plugin.nashorn
- Accept the request to trust the key used to sign the plugin
- Start the IdP to resume the IdP functions:
sc start shibd_idp
Task 5: Update RAM IdP allocations for large aggregate processing
CAF aggregates are larger and need more RAM to properly validate them. To prepare your IdP for this, adjust the RAM allocation for the JVM’s -JvmMx value using the following commands in an Administrator Command Prompt:
| Function | Command |
|---|---|
| To see what settings you already have: | c:\Program Files (x86)\Shibboleth\ProcRun\amd64\shibd_idp.exe //PS |
| To update the -JvmMx settings of the Windows Service to a 4096 mb heap size use: | c:\Program Files (x86)\Shibboleth\ProcRun\amd64 .\shibd_idp.exe //US --JvmMx 4096 |
| Then stop and start the Shibboleth IdP Daemon (shibd_idp) for it to take effect in the Administrator Command Prompt: | sc stop shibd_idp sc start shibd_idp |
v5+ new Windows installs have the following locations for default install:
- $idp_home
C:\opt\shibboleth-idp\ - $jetty_base
$idp_home\jetty-base - $jetty_home
c:\Program Files (x86)\Shibbleth\Jetty
Task 6: Update Jetty to use a commercially signed certificate for production use
The IdP installs a self-signed certificate in the base installation which is fine for testing however for pre-prod and production, the server must use a commercial certificate.
The certificate store is PKCS#12 / PFX format and is a jetty configuration referenced in: C:\opt\shibboleth-idp\jetty-base\start.d\idp.ini
And has two values you would adjust as you handle certificates: (1) Jetty.sslContext.keyStorePath=../credentials/idp-userfacing.p12 (2) Jetty.sslContext.keyStorePassword=your_long_passphrase_here
Adjust as necessary and restart the IdP if changes are made.
Improper settings on certificates will result in the service failing to start. To diagnose, check the Jetty logs first at $jetty_base\logs to determine what may be causing the problem.
Task 7: Testing via status URL
You can test that the IdP is properly installed and is at least running successfully in the java servlet container with the status command line c:\opt\shibboleth-idp\bin\status.bat
Accessing http://<idp_name>/idp/status is a useful URL to verify status manually or within your monitoring system.
To enable access:
- edit
$idp_home/conf/admin/admin.propertiesand uncommentidp.status.accessPolicy. - edit
$idp_home/conf/access-control.xmland add IP range(s) to AccessByIPAddress entry for any IP range(s) you want to allow to access the status pages. By default, access is only permitted by the local machine via the loopback address. If you don’t know which IP address you may be arriving to the IdP on, check${idp_home}/logs/idp-process.logfor the WARN events that show the IP you arrive on. - Restart the IdP:
sc stop shibd_idpsc start shibd_idp
Milestone: Base IdP is installed
If everything is working correctly, you should see output summarizing the environment and information about the IdP’s state. Ability to login is not yet enabled nor any connectivity and is a good time to document settings in your pre-prod environment for what is needed for your production environment.
Step 2 Configure Authentication Settings
Task 8: Choosing LDAP as an authentication strategy
Authenticating users is either done locally or the IdP delegates the authentication to take place elsewhere. This guide will focus on the LDAP on-premises authentication model.
After the base IdP is installed, delegating authentication can either be handed off to a CAS server or more commonly to another Identity Provider such as EntraID referred to as SAML proxying. The SAML proxy technique is endorsed by Microsoft, and has its own configuration guidance and steps.
Task 9: Configuring LDAP
A common configuration is to authenticate to an on-premises LDAP server which is controlled by settings in $idp_home/conf/ldap.properties.
Click here for a detailed description of the configuration details on the Shibboleth wiki. The following common settings are recommended.
Note: Your specific directory may require firewall access adjustments or may deviate from these basic settings in the properties file.
For Active Directory:
-
- Use authenticator type:
adAuthenticator - Use
ldapsfor secure ldap in the ldapURL: (e.g.,ldaps://dc.example.com) if ldaps, setuseStartTLS = false - For
bindDNuse the fully qualified DN (e.g.,CN=Shibboleth Bind Account,OU=Users, dc=example,dc=com) - For the user search
filteridp.attribute.resolver.LDAP.searchFilter - (|(sAMAccountName=$resolutionContext.principal)(userPrincipalName=$resolutionContext.principal@cyourdomain_realm_here_dot_ca)
- For the LDAP trust set
idp.authn.LDAP.sslConfig = certificateTrust
- Use authenticator type:
Task 10: Download IdP configuration assistance tools to assist with LDAP configuration
Clone CANARIE’s IdP widget library from GitHub or download and unzip it locally and review the “PowerShell get-SSLCerts.ps1”:
Task 11: Set the execution policy for PowerShell and fetch the ldap server certificate
In an Administrator PowerShell window set the PowerShell execution policy to unrestricted to run the fetch certificate step: Set-executionPolicy unrestricted
Source the PowerShell to load the function: ./idp-widgets-master/bin/get-SSLCert.ps1/
Extract the LDAP server TLS certificate to be used to establish trust from the IdP to the LDAP server:
Get-SSLCert -server ldap.servername.ca -OutputFile
“C:\opt\shibboleth-idp\credentials\ldap-server.crt”
Restart the idp for the updated settings to take effect.
Task 12: Verify authentication functions using Hello World app
To verify authentication is functioning follow these instructions to enable the “Hello World” app on your idp which be accessed by this url: https:/idp-name/idp/profile/admin/hello
Note: To allow access to the app, you need to add the SubjectName that you sign in as into $idphome/conf/access-control.xml in the AccessByAdminUser block and the Nashorn Javascript plugin must be installed.
Restart the IdP and visit the admin/hello site on your IdP.
Once sign-on is done, move on to the next step.
Additional References for Authentication
- Shibboleth general authentication configuration start page
- Shibboleth Password Authentication Configuration
- Shibboleth LDAP Authentication Configuration
- Shibboleth SAML Proxying Configuration
Step 3 Configure CAF Metadata trust
(est time: 5 min)
Configuring the trust between your IdP and CAF allows you to add the CAF metadata aggregates to your IdP which will:
- Securely retrieve metadata updates automatically every hour.
- Verify the aggregates using the CAF signing key (caf_metadata_verify.crt) automatically.
- Request CAF to trust your new instance of the IdP by emailing [email protected] with your metadata.
Task 13: Fetch the FIM Signing Key
To validate the aggregates, you must have the CAF signing key on disk for the IdP to use. To do this, fetch the key from the CAF Operational url: https://caf-shib2ops.ca/CoreServices/caf_metadata_verify.crt and place it in the $idp_home/credentials/caf_metadata_verify.crt file for use in the metadata verification process.
To fetch the signing key in Windows, use an Administrator level PowerShell window to execute: Invoke-webRequest -Uri https://caf-shib2ops.ca/CoreServices/caf_metadata_verify.crt -OutFile caf_metadata_verify.crt
cURL command can also be used: curl https://caf-shib2ops.ca/CoreServices/caf_metadata_verify.crt -o caf_metadata_verify.crt
Task 14: Adding CAF aggregates to your IdP
Next, establish trust between your IdP and CAF, edit metadata-providers.xml.
Common errors to look out for:
- Cutting-and-pasting errors: be sure the quotes are properly transferred and not transformed
- Missinging validation certificate: caf_metadata_verify.crt fetched in the previous step should be in the appropriate directory or the Idp will not validate the file.
Edit $idp.home/conf/metadata-providers.xml file to add the following MetadataProvider blocks –the Production Domestic aggregate, Inter-federation aggregate, and the test federation aggregate:
<MetadataProvider id="URLMD_CAF_Prod"

xsi:type="FileBackedHTTPMetadataProvider"

backingFile="%{idp.home}/metadata/caf_metadata_signed_sha256.xml"

metadataURL="https://caf-shibops.ca/CoreServices/caf_metadata_signed_sha256.xml"

failFastInitialization="false"

maxRefreshDelay="PT4H">

        <MetadataFilter xsi:type="SignatureValidation" certificateFile="%{idp.home}/credentials/caf_metadata_verify.crt" />

        <MetadataFilter xsi:type="RequiredValidUntil" maxValidityInterval="P30D"/>

        <MetadataFilter xsi:type="EntityRole" xmlns:md="urn:oasis:names:tc:SAML:2.0:metadata">

                  <RetainedRole>md:SPSSODescriptor</RetainedRole>

        </MetadataFilter>

</MetadataProvider>


   <MetadataProvider id="URLMD_CAF_interfed"

xsi:type="FileBackedHTTPMetadataProvider"

backingFile="%{idp.home}/metadata/caf_intefed_sp.xml"

           metadataURL="https://caf-shib2ops.ca/CoreServices/caf_interfed_sp.xml"

failFastInitialization="false"

maxRefreshDelay="PT1H">

        <MetadataFilter xsi:type="SignatureValidation" certificateFile="%{idp.home}/credentials/caf_metadata_verify.crt" />

        <MetadataFilter xsi:type="EntityRole" xmlns:md="urn:oasis:names:tc:SAML:2.0:metadata">

                  <RetainedRole>md:SPSSODescriptor</RetainedRole>

        </MetadataFilter>

</MetadataProvider>


<MetadataProvider id="URLMD_CAF_Testbed"

        xsi:type="FileBackedHTTPMetadataProvider"

        xmlns="urn:mace:shibboleth:2.0:metadata"

        metadataURL="https://caf-shib2ops.ca/CoreServices/testbed/caf_test_fed_unsigned.xml"

        backingFile="%{idp.home}/metadata/caf_test_fed_unsigned.xml"

        maxRefreshDelay="PT10M">

</MetadataProvider>
Hint: Metadata can be reloaded individually by running this command targeting the id value of the aggregate. This example reloads the test federation based on the id above when run from the IdP:
$idp_home\bin\reload-metadata -id URLMD_CAF_Testbed
If you have a browser on the idp server, this can also be done via web URL:
https://127.0.0.1/idp/profile/admin/reload-metadata?id=URLMDCAFTestbed
Next, email [email protected] with your new EntityID and CAF will retrieve your metadata from https://idp_name/idp/shibboleth as an on-demand retrieval. CAF does not monitor this URL so any updates adjusting SAML metadata must notify CAF of the change via email by the Primary Technical Contact or other Technical Contact.
Your metadata is also findable at $idp_home/metadata/idp-metadata.xml. Once CANARIE CAF adds your metadata to CAF, you can exercise another sign-on test with https://validator.caftest.canarie.ca which will allow you to verify your IdP with a federated service from end-to-end without needing to create your own federated service to test against.
Step 4 Configuring Attribute Resolution
The out-of-the-box attribute release of the IdP is intentionally limited to force the deployer to tailor it to their needs.
CAF recommends supporting a minimum set of attributes, enough to support the Research and Scholarship Attribute set (shown in the next step).
The guidance below will be for LDAP/Active Directory originating attributes. Sites using SAML proxying may pass attributes from the upstream IdP which are mapped to their respective fields. For more details on SAML passthrough attributes see SAML proxying details
While there are many attributes that can be used, these base mappings are recommended:
| SAML Value | Typical origin attribute to use from ldap |
|---|---|
| eduPersonPrincipalName | Uid |
| displayName | displayName |
| givenName | givenName |
| sn (SurName) | sn |
| eduPersonTargetedId | dynamically calculated by IdP |
| eduPersonAffiliation | dynamically calculated by IdP |
| eduPersonScopedAffiliation | Derived from eduPersonAffilation |
Task 15: Configure support for common LDAP attributes
Attribute resolution configuration starts with the resolver directives in the file $idp_home/config/attribute-resolver.xml.
The resolver works in conjunction with attribute registry settings, unique identifier settings managed in the saml-nameid.properties, and any specific customizations you apply to produce a reliable way to fetch, encode, and prepare the attributes.
Sites using Active Directory/LDAP for a user store should:
- backup their existing attribute-resolver.xml
- copy the example file in $idp_home/config/examples/ attribute-resolver-ldap.xml to $idp_home/config/examples/ attribute-resolver.xml
- review and adjust the exportAttributes field to ensure your attributes are made available
- review and adjust the default LDAP settings in $idp_home/config/ldap.properties to ensure appropriate settings are in place to connect to your directory
Task 16: Configuring support for eduPersonTargetedId
eduPersonTargetedId is a key opaque pseudo-anonymous identifier used in the R&S attribute bundle and from the eduPerson schema the IdP supports. This is a safe, unique identifier of a user at a given service that purposely cannot be correlated across services.
Common key services require it as well such as:
- cat.eduroam.org
- orcid.org, and
- other services using R&S attributes.
Dynamically calculated, the identifier is assembled by adding a site-specific secret salt to randomize the SHA256 hashing algorithm and then a BASE32 encoding of the value for new installs. If you already use this attribute, be sure to review the use of BASE64 for legacy and those who may be upgrading should review their use of BASE64 for legacy purposes.
To enable eduPersonTargetedId:
1. Add the attribute definition in attribute-resolver.xml:
<!-- uses the attributes/custom/eptid.properties file -->

    <AttributeDefinition id="eduPersonTargetedID" xsi:type="SAML2NameID" nameIdFormat="urn:oasis:names:tc:SAML:2.0:nameid-format:persistent" >
    <InputDataConnector ref="computed" attributeNames="computedId" />
2. Add a related DataConnector in attribute-resolver.xml at the bottom
<!--
    DataConnector for pairwise-id (example depends in part on saml-nameid.properties).
    Note that this relies on BASE32 encoding in accordance with the attribute definition.
    Older uses of this plugin for legacy eduPersonTargetedID/NameID values may require
    different settings.
    -->
    <DataConnector id="computed" xsi:type="ComputedId"
        excludeResolutionPhases="c14n/attribute"
	    generatedAttributeID="computedId"
	    salt="%{idp.persistentId.salt}"
	    algorithm="%{idp.persistentId.algorithm:SHA}"
	    encoding="%{idp.persistentId.encoding:BASE32}">
3. The file $idp_home/conf/attributes/custom/eptid.properties file with:
id = eduPersonTargetedID
transcoder = SAML2XMLObjectTranscoder SAML1XMLObjectTranscoder
saml2.name = urn:oid:1.3.6.1.4.1.5923.1.1.1.10
The file $idp_home/conf/saml-nameid.properties file updated with:
idp.persistentId.sourceAttribute = sAMAccountName The file $idp_home/credentials/secrets.properties file updated with
Idp.persistentId.salt= <choice-of-long-random-string-here>

idp.authn.LDAP.bindDNCredential is the password for bind user
Task 17: Configuring support for eduPersonAffiliation and eduPersonScopedAffiliation
edupersonAffiliation is used to populate eduPersonScopedAffiliation which is the same constrained values but with the ‘@yourdomain.ca’ scope chosen at the very first step of the install process.
Both are part of the eduPerson schema and must only contain values as both what can be assigned and under what technique is prescribed in the eduPerson schema reference. It is typically multi-valued with [email protected] along with any other standing in your institution
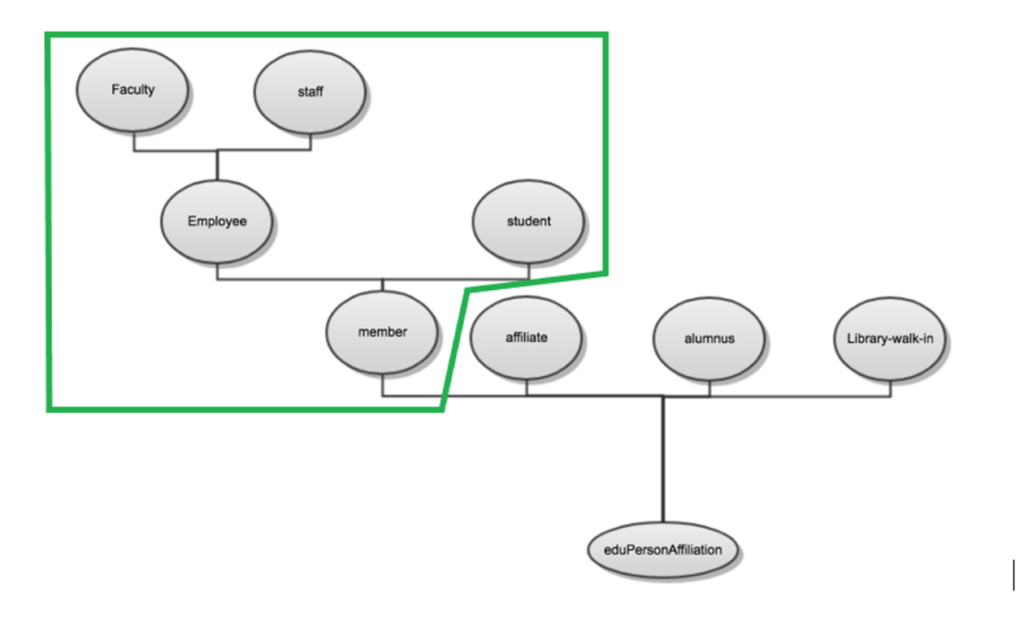
If you are fortunate, your groups to eduPersonAffiliation map 1:1 and you can easily map the groups dynamically
There are 3 common scenarios to set these values:
- Use eduPersonAffiliation attribute out of your directory – an example of this is shown in: $idp_home/config/examples/ attribute-resolver-ldap.xml
- Statically assign everyone the exact same value for ALL users who can authenticate in your IdP, As shown in $idp_home/conf/attribute-resolver.xml
- Dynamically map a users’ group to an eduPersonAffiliation. To do the mapping add the following to attribute-resolver.xml
<AttributeDefinition xsi:type="Mapped" id="eduPersonAffiliation">

<InputDataConnector ref="myLDAP" attributeNames="memberOf" />
<DefaultValue passThru="false"/>

<ValueMap>
<ReturnValue>employee</ReturnValue>
<SourceValue>%{idp.attribute.resolver.proxymapping.group.employee}</SourceValue>
</ValueMap>
<ValueMap>
<ReturnValue>staff</ReturnValue>
<SourceValue>%{idp.attribute.resolver.proxymapping.group.staff}</SourceValue>
</ValueMap>
<ValueMap>
<ReturnValue>faculty</ReturnValue>
<SourceValue>%{idp.attribute.resolver.proxymapping.group.faculty}</SourceValue>
</ValueMap>
<ValueMap>
<ReturnValue>student</ReturnValue>
<SourceValue>%{idp.attribute.resolver.proxymapping.group.student}</SourceValue>
</ValueMap>
<ValueMap>
<ReturnValue>member</ReturnValue>
<SourceValue>%{idp.attribute.resolver.proxymapping.group.employee}</SourceValue>
<SourceValue>%{idp.attribute.resolver.proxymapping.group.staff}</SourceValue>
<SourceValue>%{idp.attribute.resolver.proxymapping.group.faculty}</SourceValue>
<SourceValue>%{idp.attribute.resolver.proxymapping.group.student}</SourceValue>
<SourceValue>%{idp.attribute.resolver.proxymapping.group.member}</SourceValue>
</ValueMap>
</AttributeDefinition>
- Then add the following to $idp_home/conf/idp.properties
dp.attribute.resolver.proxymapping.group.employee=recommended_to_be_set_to_a_group_dn
idp.attribute.resolver.proxymapping.group.staff= recommended_to_be_set_to_a_group_dn
idp.attribute.resolver.proxymapping.group.faculty=recommended_to_be_set_to_a_group_dn
idp.attribute.resolver.proxymapping.group.student=recommended_to_be_set_to_a_group_dn
# member is implied as presence in one of the above or explicitly as this group
idp.attribute.resolver.proxymapping.group.member=recommended_to_be_set_to_a_group_dn
If neither of these options fit, the custom scripted attributes will allow any configuration to be used.
Step 5 Configuring Attribute Release
Out-of-the-box, the identity provider has some example configuration for attribute release found in $idp_home/conf/attribute-filter.xml
Task 17: Configure CAF recommended attribute release policies enabling for use with most services
Since most key services use the R&S entity category, adding the one rule will enable access to many of the key CAF services. Orcid.org is also a frequently asked for service and has the release rules.
<!-- ##########################################
#
#   Sites: Those tagged with the REFEDS.org Research and Scholarship category
#   CANARIE Reference: https://www.canarie.ca/identity/support/rs-entity-category-technical-instructions/
#
#  When enabled, ensure that [email protected] has been notified that you have done so.
#  Your IdP record will receive the necessary entity category on your IdP signaling you support it.
-->
<AttributeFilterPolicy id="CAF-releaseRandSAttributeBundle">
    <PolicyRequirementRule xsi:type="EntityAttributeExactMatch"
        attributeName="http://macedir.org/entity-category"
        attributeValue="http://refeds.org/category/research-and-scholarship" />

<AttributeRule attributeID="eduPersonPrincipalName">
    <PermitValueRule xsi:type="ANY" />
  </AttributeRule>
  <AttributeRule attributeID="eduPersonTargetedID">
    <PermitValueRule xsi:type="ANY" />
  </AttributeRule>

<!-- note 'email' should match your attribute-resolver.xml attributeID field for friendly name 'mail'
 This rule permits 'mail', urn:oid:0.9.2342.19200300.100.1.3 to be populated -->
  <AttributeRule attributeID="mail">
    <PermitValueRule xsi:type="ANY" />
  </AttributeRule>

  <AttributeRule attributeID="displayName">
    <PermitValueRule xsi:type="ANY" />
  </AttributeRule>
  <AttributeRule attributeID="givenName">
    <PermitValueRule xsi:type="ANY" />
  </AttributeRule>
  <AttributeRule attributeID="sn">
    <PermitValueRule xsi:type="ANY" />
  </AttributeRule>

  <!-- Affiliation is optional, but release is still "strongly recommended". -->
  <AttributeRule attributeID="eduPersonScopedAffiliation">
    <PermitValueRule xsi:type="ANY" />
  </AttributeRule>

</AttributeFilterPolicy>

<!-- ##########################################
#
#   Site: orcid.org
#   Purpose: Researcher identifier information
# see: https://info.orcid.org/documentation/integration-guide/sign-into-orcid-with-institutional-credentials/
#
  -->

<AttributeFilterPolicy id="CAF-orcid-org">
        <PolicyRequirementRule xsi:type="Requester" value="https://orcid.org/saml2/sp/1" />
                <AttributeRule attributeID="eduPersonTargetedID" permitAny="true" />
                <AttributeRule attributeID="eduPersonPrincipalName" permitAny="true" />
                <AttributeRule attributeID="mail" permitAny="true" />
                <AttributeRule attributeID="cn" permitAny="true" />
                <AttributeRule attributeID="sn" permitAny="true" />
                <AttributeRule attributeID="mail" permitAny="true" />
                <AttributeRule attributeID="givenName" permitAny="true" />
                <AttributeRule attributeID="eduPersonScopedAffiliation" permitAny="true" />
                <AttributeRule attributeID="displayName" permitAny="true" />

</AttributeFilterPolicy>
Step 6 Going live and testing
There are many techniques to validate your environment. We recommend starting with local verification using the “Hello World” app and the local command line tester called AACLI which can test the attribute release calculations without sign-on. It works best for local authentication however does not work for SAML proxying.
To access to more testing options prior to your Go Live, email [email protected] with your EntityID and we will retrieve your metadata from the online url to be published.
CAF maintains a Test Federation for sites who have a test identity provider or wish to work in a test context before moving to production. Although we encourage a test phase, it is NOT a requirement to test your IdP in the Test Federation before being added to production.
An additional optional step for further validation is to use our online validator (available in both test and production) and also eduGAIN release-check service which can validate your R&S release in real-time but only in production.
If you are going to support R&S, we require a request from the Primary Technical Contact with your filled out R&S Request form with your EntityID to Join the R&S Entity Category
Congratulations, you have just brought your Identity provider online!
Additional Material: IdP installation decision tree