

Jump in…
- Overview
- Requirements
- Setup
- Jenkins Configuration
- Dependencies
- Troubleshooting
- Replacing Self-Signed Certificate
- Upgrading Jenkins
Overview
Jenkins is a leading open source automation server, which provides hundreds of plugins to support building, deploying, and automating any project. This guide will show you how to launch and configure a basic Jenkins setup using Docker in the DAIR Cloud.
Requirements
You should have previously read and followed the DAIR Technical Guide – Docker: Using Docker with the DAIR Cloud to be familiar with launching Docker hosts in DAIR using Docker Machine. You may also find it handy to refer to the Docker Commands for Daily Life as a quick reference to the most common Docker commands.
You will also need a Git client application to clone the repository containing Jenkins and Nginx (HTTP and reverse proxy server). If you are not familiar with Git, you can learn more by reading the official install guide. Alternatively, you can download this repository as a zip archive instead.
Setup
Execute the following commands on the machine that has Docker Machine and Docker Compose installed:
Step 1: Clone this repository:
git clone https://solutions.cloud.canarie.ca:3000/DAIR/dair-jenkins-guide
cd dair-jenkins-guide
Step 2: Verify that you are configured to deploy to the DAIR instance you have created.
docker-machine active Note: the “docker-machine ls” command may help you remember previously created machines.
If the above command results in “No active found”, run the following two commands:
$ docker-machine env
Hostname

cp://208.75.xx.yy:2376"
$ eval $(docker-machine env Hostname)
Where Hostname is replaced with the Docker Hostname you provided when you created your Docker machine (refer to “Using Docker with the DAIR Cloud” in the Requirements section above).
Step 3: Build the Docker images. There are two images; one is the Jenkins image itself, the other is an Nginx image. The Nginx image will be used to proxy access to Jenkins and perform SSL termination.
docker-compose build By running the “docker images” command, you should see something like this:
$ docker images

REPOSITORY                   TAG                 IMAGE ID            CREATED             SIZE

dair-jenkins-guide_nginx     latest              b6554930ab8e        3 hours ago         111 MB

dair-jenkins-guide_jenkins   latest              d1dd6dd31ba6        4 hours ago         700 MB

docker.io/nginx              1.15.2              c82521676580        8 days ago          109 MB

docker.io/jenkins/jenkins    lts                 80fc01fa46f9        2 weeks ago         700 MB
The first two images are the most recently built. The remaining two are the images used as a base and downloaded as part of the build process.
Step 4: You are now ready to launch the containers.
docker-compose up -d To confirm your containers are up and running, run the “docker ps” command; its output will be something like this:
$ docker ps

CONTAINER ID        IMAGE                        COMMAND                  CREATED             STATUS              PORTS                                         NAMES

811d7a26cffe        dair-jenkins-guide_nginx     "nginx -g 'daemon ..."   4 hours ago         Up 4 hours          0.0.0.0:80->80/tcp, 0.0.0.0:443->443/tcp      nginx

4e88fe01ac10        dair-jenkins-guide_jenkins   "/sbin/tini -- /us..."   4 hours ago         Up 4 hours          8080/tcp, 0.0.0.0:5000->5000/tcp, 50000/tcp   jenkins
Now that the containerized services are running, access the Jenkins web interface in your browser at https://<floating_ip>. The browser will produce a warning about an invalid certificate that can be ignored. Since Nginx is using a self-signed certificate, add an exception to Jenkins.
The page will look like this:

Run the following command to obtain the Jenkins Admin password:
docker-compose exec jenkins cat /var/jenkins_home/secrets/initialAdminPassword Next, customize Jenkins by installing some plugins:

If you are unsure which option to choose, pick the suggested plugins. You can always install and remove plugins after finishing the setup process.
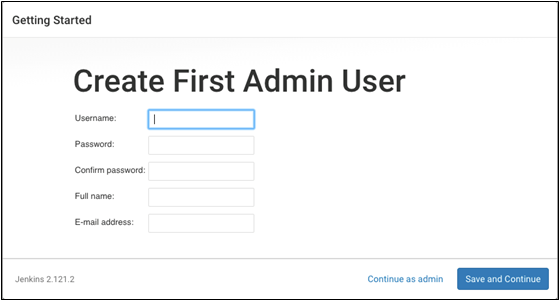
When the plugin installation is complete, fill in the details for the first admin user:
Finally, set the Jenkins URL:
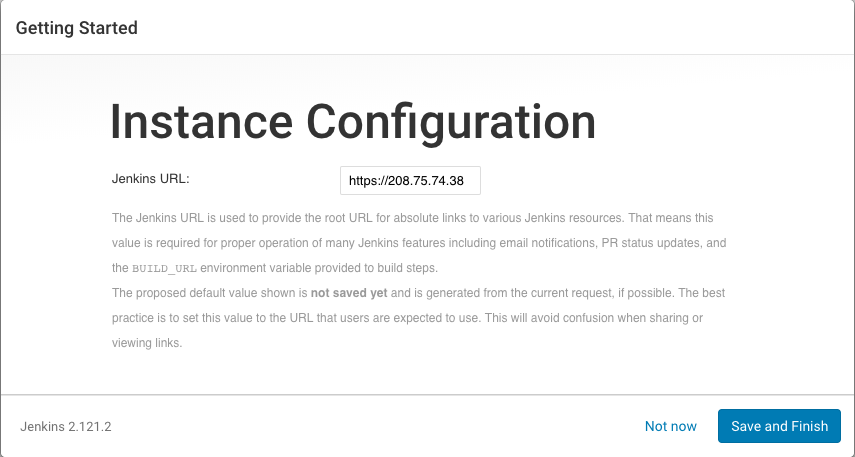
The default value is correct since Jenkins access was already achieved via the floating IP of the Docker Machine host.
Now you can login with the user account you just created and start using Jenkins!
Jenkins Configuration
Jenkins is incredibly configurable, even more so when you consider the wide range of plugins available. If you are unfamiliar, we strongly recommend reviewing the documentation.
Almost all Jenkins configuration can be done through the web interface; however, if you need to manually edit something, or just want to poke around, running the following command will give you an interactive shell inside the container to do so:
docker-compose exec jenkins bash Any changes made under the /var/jenkins_home directory will be persisted even if the container is destroyed and re-created because it is actually a Docker-managed volume that is mounted inside the container itself.
Dependencies
Dependencies will have to be added if they are not already in the Jenkins image. See jenkins/Dockerfile for instructions then rebuild the image and re-create the container:
docker-compose build
docker-compose up –d –-no-deps jenkins
Troubleshooting
If you run into any problems, you can access the logs of each container with these commands:
docker-compose logs jenkins
docker-compose logs nginx
Replacing Self-Signed Certificate
When the Nginx image is built, a self-signed certificate is created to enable HTTPS, which is why you have to create an exception the first time you access Jenkins. If you have your own domain and certificate, you can replace the self-signed certificate once Nginx is running with the following commands:
docker cp /path/to/cert nginx:/etc/nginx/ssl/server.crt
docker cp /path/to/key nginx:/etc/nginx/ssl/server.key
docker-compose restart nginx
The directory /etc/nginx/ssl is mounted as data volume through Docker. Even if the container is removed, the certificate and key will still be in place when it is run again. To remove the volume, run this command:
docker volume rm dair-jenkins-guide_nginx-ssl Upgrading Jenkins
The Dockerfile used to build the Jenkins image uses the LTS release of Jenkins, in which its features can become out-of-date. To use a newer version, edit the first line of jenkins/Dockerfile and replace lts with either latest (for the most recent version) or a specific version like 2.135. Note that you do so at your own risk and this documentation may not be accurate for newer versions. After modifying jenkins/Dockerfile, the image and Jenkins container need to be rebuilt with the following commands:
docker-compose build
docker-compose up -d --no-deps jenkins